Bookings with manual approval
If you want to check bookings first in order to decide individually whether an attendee should be admitted or rejected, you can use the booking approval function. You can also set up an email that can be sent to individual bookers with one click, for example to request further information to decide about his attendance.
Possible use cases:
- VIP tickets should only be bookable by selected persons
- You only want to “collect” attendees for the time being and only when a certain minimum number has been reached and the event can take place, release the bookings and send the attendees to the payment page so that they can complete their bookings
- Require prior submission and verification of proof to attend an event (e.g., press accreditation, employer approval, student ID)
- You would like to keep the option open to edit the booking before it is approved and, for example, change the ticket or product selection or subsequently enter a promotion code.
Tip: Each booking request has to be confirmed individually. So if you expect a high number of bookings, please consider the time involved as well as the delays in the booking process for your attendees. doo offers various methods how you can control the bookings for your event and, if necessary, “protect” your event from unwanted bookers – we have compiled an overview for you here.
1. Booking process for events with booking approval
After a booker booked a ticket for which manual approval has been activated (in case of fee-based bookings the payment page will be skipped), he will be redirected to a confirmation page, which will inform him that his order still needs to be approved by the organizer.
The attendee receives an automatic email (email text: booking approval) immediately after the booking, in which he gets notified that the booking will not be completed until it has been approved by the organizer.
If the organizer approves the order, another email is sent out. If the booking is free of charge the booker will immediately receive the regular booking confirmation email – bookers of chargeable bookings will get another mail (email text: Approval confirmation and Payment Request) with the request to complete the booking by clicking on a button leading to the payment page.
Only after the payment has been made, the booker will receive the final confirmation, including his ticket(s) if activated (email text: booking confirmation).
Also in case that a booking is rejected, the booker gets notified via email (e-mail text: booking rejection). The corresponding booking will accordingly not be included in the attendee list.
All email texts can be edited in the email contents settings.
2. Setting up the booking approval
2.1 Activating the manual approval
To activate manual approval for one of your events, please open the event details and select “Booking approval and waiting list” from the menu on the right.
Please activate the checkbox in the section “Manual booking approval”.
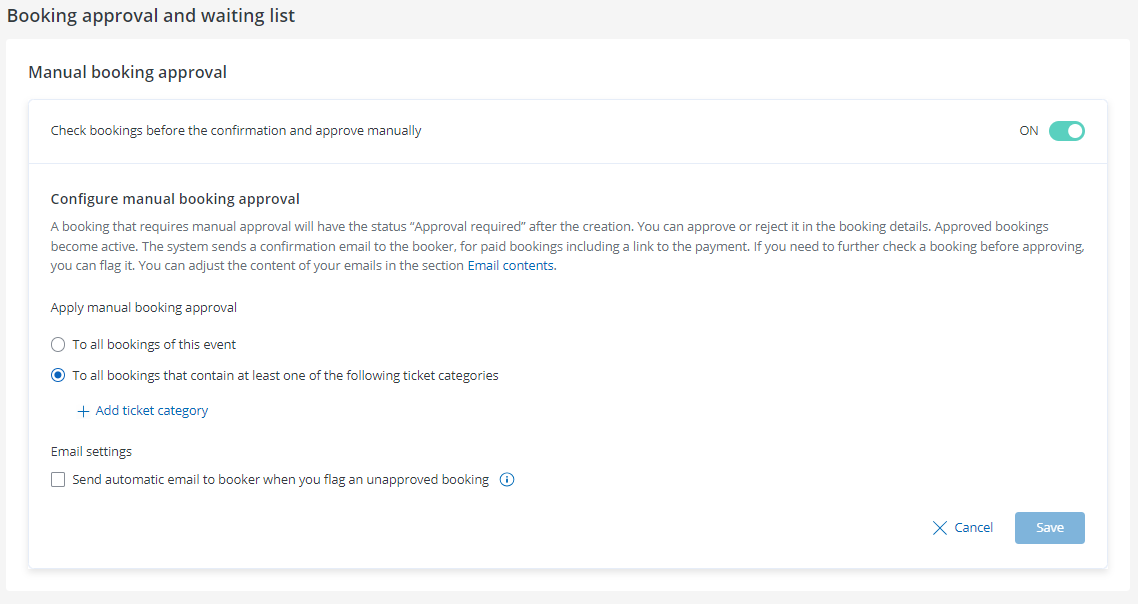
You can now choose whether you want to activate manual approval for all bookings of the event or just for selected ticket categories (available for Enterprise users only) – the latter can then be selected in the next step by clicking “+ Add ticket category”
Under “Email settings”, you can decide whether an automatic message should be sent to the booker if you flag a booking
You can then click on “Accept” to save the approval settings.
In the next step, you should check the email contents of the release emails and adjust them if necessary. Detailed information on how to adjust the email content can be found at here.
2.2 Deactivating the manual approval
If you activated booking approval for your event and would like to deactivate it again, you only need to remove the corresponding checkbox in the event settings under “Booking approval and waiting list”.
Please note that the deactivation does not only apply to future bookings but also for existing ones: Once the approval function is deactivated all bookings with pending approval are automatically approved and the respective bookers receive the corresponding notification emails. Thus please make sure to review all currently pending bookings, possibly rejecting ones you don’t want to get approved, before deactivating the manual approval for your event.
3. Managing bookings with pending approval
Bookings of ticket categories for which manual booking approval has been activated are considered as normal bookings when calculating the available ticket capacity. These reserved tickets can be released by you for other bookers if you reject the booking.
Tip: If you want to, you have the option to receive an email notification every time someone makes a booking that needs to be approved. To activate this function for your organisation account you’ll need to get in contact with our Support Team.
To approve, flag or reject bookings, please proceed as follows:
- Open the booking overview
- Search for bookings with status “Approval required”. You can use the “Additional search options” to filter by booking status “Approval required” so that only the bookings that still need to be reviewed by you are getting displayed. Select the booking you would like to review from the list in order to see booking details.
- If you click on “Edit data” on the booking details page, you can view the data that was entered by the booker during the registration process in order to decide how you would like to proceed with that booking.

Alternatively, you can also approve, flag or reject several bookings at the same time in the booking overview. To do so, activate the checkbox for the corresponding bookings and click on the desired action at the top.

3.1 Changing a booking
As long as a booking has not been approved yet, it is still possible to change it. If you would like to edit the ticket category or product selection, to add or remove an attendee or to apply a promotion code to that booking, please click on “Change booking”.

You’ll be forwarded to a page where you can make the desired changes and, for example, edit the ticket selection or add and remove attendees. After saving the changes, the booker will automatically be notified about the changes via email. The booking keeps the status “Approval required” and can be approved by you afterwards (see 3.2).
3.2 Approve booking
If you confirm the booking by clicking on “Approve” you accept the registration of all attendees of this booking for your event. The approval triggers an automatic email to the booker. If it’s a free booking, the booker will automatically receive the booking confirmation. For bookings that require payment, the booker receives an email with a link to select the method of payment – the booker should initiate the payment process before the start of the event, since after the end of the event, invoicing and payment processing via doo is no longer possible.
If a booker starts the payment process but does not complete it, the booking will be shown in the overview with the status “cancelled” and you have the possibility to resend the request manually via the booking details page. After successful payment, the booking confirmation will be sent to the booker.
Attention: The approval of the booking cannot be undone!
Once a booking has been approved (and a payment method has been selected for paid bookings), attendees are added to the attendee list, which you can download as an Excel file. For more information about downloading booking and attendee lists, please click here.
Important: The payment method for fee-based bookings must be selected before the end of the event. Afterwards it cannot be selected anymore to complete the booking and make a payment.
3.3 Flag booking
By flagging a booking, you can mark it for yourself as already reviewed in order decide at a later point whether the booking should be confirmed or rejected. Until then, the posting is marked with the status “Flagged” in the booking overview.
If you have activated the option “Send automatic email to booker when you flag an unapproved booking” in the approval settings (see 2.1.), an automatic message is sent to the booker. This option is useful, for example, to inform the booker that he should send you further information or required evidence so that you can approve his registration.
3.4 Reject booking
If you reject the booking, none of the attendees can attend your event. An automatic denial email is sent to the booker.
Attention: The rejection of a booking cannot be undone!