Filtered cross-event widgets: How to show only selected events
By default, all upcoming events in your doo account are displayed in the cross-event calendar and list widgets.
If you don’t want all your doo events to be displayed there, you have the possibility to build a filter for the standard widget, so that only selected events appear in the overview on your homepage.
The filter works on the basis of internal event fields. All events that should appear in the widget must have the same event field.
1. Create a filtered widget
1. Create a new event field in the organization settings (cogwheel icon in the upper right corner) under the tab “Events”.
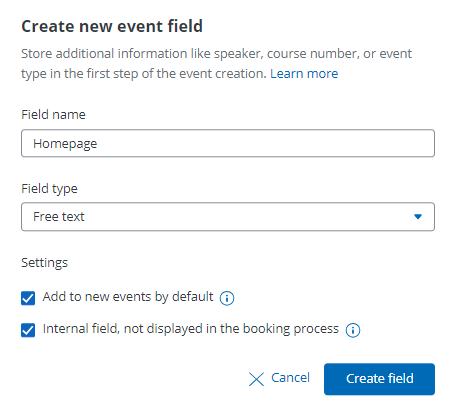
2. Enter a name e.g “Homepage” (the name must only be one word without blank spaces or special characters), choose the input format “Free text” and activate the checkbox “Internal field , not displayed in the booking process”. To avoid having to manually add the field to new events that will be created in the future, you can additionally activate the checkbox “Add by default for new events”. General information on event fields can be found here.
3. Create a new event or open an existing event.
4. In the first step of the event creation (“Event information“), please scroll down to “Advanced Settings”, click on “+ Add event field” and select the respetive field. If you create a new event and previously checked the “Add by default for new events” checkbox in the organization settings, the field will already appear automatically.
5. Enter “Homepage” into the text field and confirm by clicking “Create field”
6. Click on “Save” at the bottom of the page
7. Now you can add the event field “Homepage” to all events that should be displayed in the widget of your website by editing them respectively
8. After all events have been edited, go back to the event overview and click on “Integrate in website” in order to create a cross-event widget. General information on how to create widgets can be found here.
9. In the next step, the code of your new widget needs to be adjusted manually to add the filter. Please insert the following line before the first “>” of the code:
data-viovendi-event-attributes="Youreventfieldname"
10. The adjusted widget code with the added snipped should then look like this (with different numbers):
<div class="viovendi-widget viovendi-event-list-widget"

data-viovendi-locale="de-de"

data-viovendi-organizer="123456"

data-viovendi-widget-config-name="list-123456-123"

data-viovendi-event-attributes="Homepage">

</div>

<script type="text/javascript" src="https://doo.net/viovendi-embed.js" data-viovendi-version="1"></script>
11. Now you can integrate the adjusted code in your website. Only the events for which the field “Homepage” has been activated will appear in the overview. You can add or remove events from the widget by adding or deleting the event field in the settings of the event.
If the code does not work, please send the widget name, the code you customized and the name of the field you created for filtering to our Support Team so we can check what’s wrong.
In case the code does not work as expected, please send the widget name, the adjusted code and the name of the event field you created for the filter to our Support Team so that we can have a look.