Managing contact data fields
For each contact you can store certain data in doo to use it for different purposes. For this, doo offers a list of preconfigured system data fields. These include data fields for name, organization, address, email address as well as external customer ID. In the Enterprise plan, you have the option to define your own fields such as date of birth, phone number or job title.
When you start using doo, it makes sense to think about what data you need from your customers. Of course, you can still create or archive contact data fields later on. But an account that is configured appropriately from the start means less work afterwards and more data consistency. This is even more important if you want to synchronize the data with an external system like a CRM or marketing software.
Read below
- Where to manage contact data fields.
- How to customize response options for system fields.
- How to create and manage your own contact data fields.
1. Where do I manage my contact data fields?
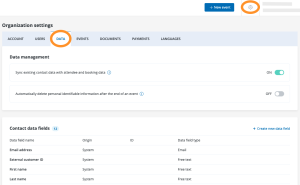
The options for managing your contact data fields is located in the organization settings and is only accessible to administrators. To access your organization’s settings, click the gear icon next to your name in the top bar and then select the “Data” tab. The overview shows you all system data fields as well as all fields that have been created for your organization.
2. Editing the selection options for Salutation and Title 

Pro and Enterprise users have the option of adding further response options to the system fields “Salutation” and “Title” as well as archiving existing ones. By default, “Mr.” and “Ms.” are available as salutations, and “Dr.” and “Prof.” are available as titles. If these values are not sufficient for you or you prefer other titles, you can use this function to customize the answer options. Any changes you make to your contact information will be applied to booking and attendee questions.
Example: You might want to add “Divers” as a third option for gender or give your customers more titles to choose from, such as “Prof. Dr.” or “Dipl.-Ing.”.
To change the answer options, click on the pencil icon by the respective data field. In the pop-up that opens, you can edit the answer options by adding new ones or archiving existing ones by clicking on the trash icon. Entries of up to 40 values with up to 50 characters each are possible. The order of the answer options can be changed by drag & drop. To do this, click on the eight dots to the left of an answer option and move it to the desired position.

Then confirm your changes by clicking on “Save”. From now on, you can select the values for contacts. For bookers and attendees, the current values are also displayed. If you archive a value, existing contacts, bookings or attendees with this value will not be changed. However, as soon as you edit them, you need to select a current value.
Especially if you have many values, you can also use the contact import to create the values in the doo system. For this you have to activate the corresponding function “Add new values as response options to the system fields “Salutation” and “Title””. In the second step, you then assign the doo data field to the field from your import file that contains the new values. After the import, the new values will be available to you. Please note that the import is currently only available for German and for English the same values are taken over as for German. The maximum values mentioned above also apply to the import.
3. Adding and editing custom data fields
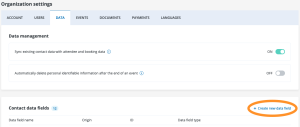
To add a new custom data field for your doo contacts, as an Enterprise user you can click on “Create new data field” in the upper right corner.
In the window that opens, you can specify the name for the field and define the data field type.
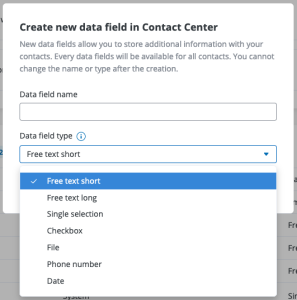
Important: Please note that the name cannot be changed later and must be unique to your organization. A subsequent adjustment of the name of a data field is accordingly only possible by archiving and creating a new field with a different name. Please refer to the information on archiving data fields in this article.
After entering the desired data, click “Create” to create the new field. The changes will be applied directly to your entire contact center.
With the data field type “Selection list” you can also add new answer options afterwards, archive existing ones as well as change the order by drag & drop by clicking on the eight dots to the left of an answer option and dragging it to the desired position. When you archive a value, existing contacts, bookings or attendees with that value are not changed. However, once you edit them, you will need to select a current value.
Tip: In addition to being able to create new data fields in the Organization Settings, you can also do this directly during contact import by creating a new data field in the second step of the process when assigning a column from your table. You can also import answer options for selection lists (with the maximum values mentioned above). To do this, in the first step you must activate the corresponding function “Add new values as response options to own data fields”. In the second step you then assign the doo data field to the field from your import file that contains the new values. After the import, the new values will then be available to you.
3.1. Syncing booking and attendee questions with contact data fields
You can map your custom booker and attendee questions to your custom contact data fields. This makes sense if you want to prefill the existing contact data in the booking process or synchronize the information from the registration with your contact center. To do this, go to step 3 of event editing (“Attendee data”). Here, you can map to the corresponding contact data field to your custom questions using the “Connect to contact center (optional)” field. You can find more on the topic of attendee and booker questions here.
3.2. Archiving custom data fields
You have the opportunity to archive contact data fields by clicking on the trash symbol in the overview of the contact data fields in your organisation settings.

Important: Please note that archiving a data field by clicking on the bucket symbol is irreversible! All contact data, that were saved in this field will be lost irretrievably. Therefore we suggest to save all data by making a contact export before the archiving.
Important: Also note that after archiving a data field, it is not possible to create a new field with the exact same name due to technical reasons.