Shorten the booking process and prefill data: How to make the booking process as convenient as possible for bookers
To make the booking process as fast and convenient as possible for your attendees, you can prefill known data. For example, you can already enter personal data such as name, address and email address or preconfigure the ticket selection. The following article explains what option you have to shorten the booking process:
- Preconfiguring the ticket selection
- Prefill attendee and booking data
- Skip booking steps
1. Preconfiguring the ticket selection
Especially for simple events with only one ticket category, it makes sense to relieve the booker of the selection and preselect the ticket category. When booking via an invitation link from an email message or by configuration in the widget code, you can even skip the (prepopulated) ticket selection and guide the booker directly to the data entry (see below).
1.1. Settings in the event
In event editing, you can specify in the settings box of a ticket category that this ticket category should be preselected in the booking process.
1.2. Ticket selection via email message
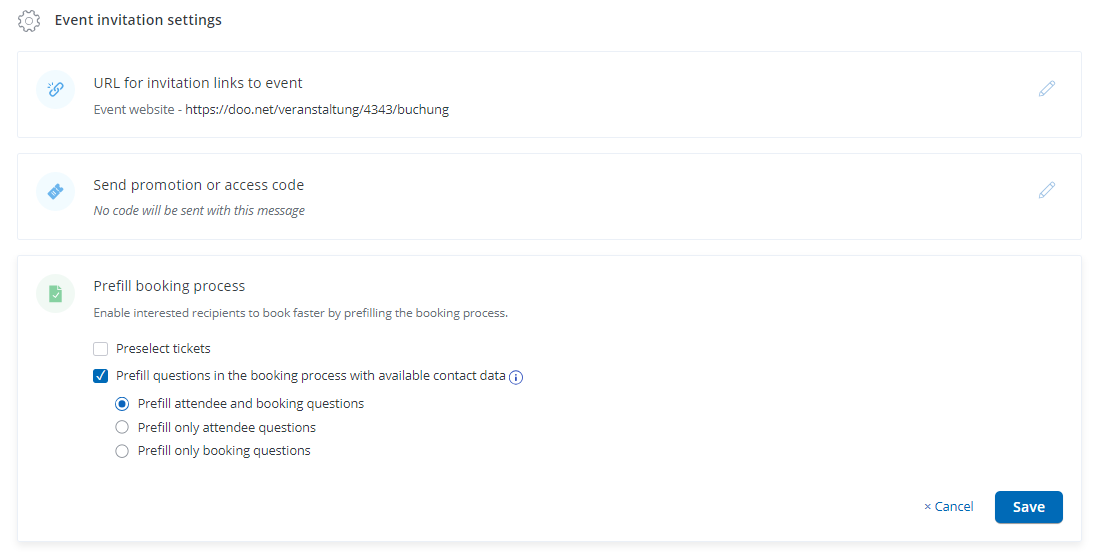
If you invite your contacts via email message, you can specify the ticket selection for a booking via an invitation link in the email settings. To do this, first add the special link Invitation > Register to your email message in the design and content step. After saving, you will see the settings for your event invitation at the bottom of the message details. Click on the pencil icon in the “Prefill booking process” box. Here you can preselect a ticket category as well as the number of tickets. Additionally, you can prevent the booker from changing the selection by checking the corresponding option. If this option is activated, the first step will be skipped completely.
1.3. Ticket selection via widget code
Another way to preconfigure the ticket selection is to pass the desired selection in the widget code. To do this, you need to integrate the booking process into your website via widget. The code snippet that you get in the embedding menu can be extended with the parameter “data-viovendi-code-tickets-prefill”. With this option it is possible to pass a more complex selection than in the case of ticket selection via email message.
2. Prefill of attendee and booking data
To save your bookers from typing in data that you already know, you can prefill these answers to the questions in the booking process. This applies both to predefined questions such as name, address or email address, and to your custom questions that you have created yourself.
You have two options as a source for the data: Either you use the contact data from the doo contact center or you transfer the data via the widget code. In the latter case, the data can come from any third party system. You will need an integration of the third party system with your website where the widget with the booking process is embedded. Such a solution is especially suitable for websites with a personal login area, such as an intranet, a customer portal or a members area.
In addition to the questions visible to the booker, you can also pass data in the background for hidden questions that only you can see. This is helpful, for example, if you want to store an external customer ID alongside the booking so that it can be assigned to the correct customer in your CRM or ERP. Or you want to transfer invoice or accounting relevant data like an order number or a cost center in the background.
Tip: If you do not want to or cannot prefill the attendee and booking data, you can still make registration more convenient for your bookers by preselecting the country and combining attendee and booker using the settings available in the third step of event editing. More information about these settings and an explanation of the difference between attendee and booker can be found here.
Note: As attendee data, in general you can only prefill the data of the first attendee. It is not possible to prepopulate multiple attendees or to transfer different attendee data sets for one booking.
2.1 Prefill attendee and booking data with data from the doo contact center.
Important: If you want to prefill your custom questions in the booking process using data from the doo contact center, make sure that you have mapped the question to the corresponding contact data field in advance. This also applies to hidden questions. The doo system questions are automatically associated with the corresponding system contact data fields. How to map questions and contact data fields is explained here. The system will always prepopulate all data for the questions configured for the event, if this data is stored for the contact. There is no option to prepopulate only specific questions, for example, only the email address. Missing data that the contact provides during the booking process is added to the contact in doo. How data changes are handled depends on your organization settings as well as the setting for handling email address changes.
2.1.1 Personalized access codes
For this solution you create one-time redeemable access codes and personalize them. This way, each code is associated with a contact. As soon as the access code is redeemed in the booking process, the system checks to which contact the entered code is assigned and takes over the data available in the contact center for this contact. This solution also allows you to combine the digital and analog worlds: for example, you can send the personalized access codes via letter invitations.
In the access code settings, you can activate the option to prepopulate the data when the code is redeemed. You can decide whether only attendee or booking questions or both are prefilled with the same data set. It is not possible to pass different data sets for attendees and bookers.
Find more information on how to create access codes here.
You can also pass a personalized access code in the widget code if you have embedded the booking process via widget in your website. In this case, the code is automatically redeemed and the booker does not have to enter it separately.
2.1.2. Email messages
Another way to access the doo contact details in the booking process is to send an invitation via the doo Email Manager. When a recipient books via the invitation link, the recipient contact data can be prefilled.
To do this, first add the special link Invitation > Register to your email message in the design and content step. After saving, you will see the settings for your event invitation at the bottom of the message details. Click the pencil icon by the “Prefill booking process” box. Then check the box “Prefill questions in the booking process with available contact details”. Now you can decide whether only attendee or booking questions or both will be prepopulated with the same data set. It is not possible to pass different data sets for attendee and booker.
2.2 Prefill attendee and booking data via widget code
If the data you want to prepopulate in the booking process is not available in your doo contact center but in a third party system like a CRM or a member management, you can pass this data by code when calling the booking widget. With this solution you can pass two separate records for attendee and booker, but not multiple records for multiple attendees.
2.3 Editing possibility of prefilled data by bookers
In the third step of event editing, you can specify in the “Advanced settings” whether your bookers are allowed to change the prefilled data in the booking process or not. This setting applies to all prefill options.
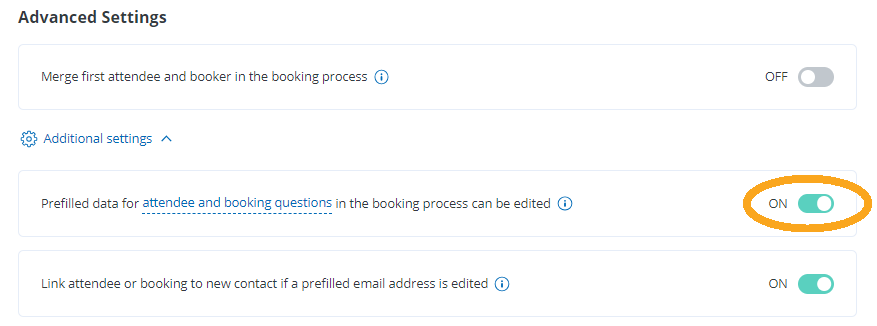
If you disable the editing option for bookers, the booker will not be able to modify prefilled data. This way you can ensure that invitees cannot use their invitation to register someone else. Empty fields can be filled in even when editing is disabled. The answers are automatically synced to the contact. Locking editing has no effect on bookings where the contact is not pre-identified. If you want to make the event accessible only to a predefined circle, use, for example, the solution via the personalized access code – this way only people with a code can register.
If you allow editing, you can limit this to attendee or booking level. For example, if you want to ensure that only the invited person comes to the event, but they should be able to adjust the invoice address, you can prepopulate the data for attendees and bookers, but turn on editing only for attendee questions.
You should also consider whether or not to keep the assignment of the booking to the original contact when the booker changes the email address.
3. Skipping booking steps
In addition to prepopulating ticket selection and questions, you can also shorten the booking process by skipping selected steps.
You can skip the first step with ticket selection when prefilling data via email message (see description above). Also, you have the possibility to skip any of the three steps using parameters in the widget code. However, only two steps can be skipped for one booking, and for free bookings only one, as the booker must confirm once. Or in other words: Less than one-click is not possible.
In order for a step to be skipped, all data and settings must be prepopulated. For example, if a preselected ticket category is fully booked or mandatory questions were not covered by the prefilled data, the step will be displayed to the booker.
You can skip the individual steps by passing the value “autosubmit” in the widget for the parameter “data-viovendi-ticket-selection-step-behavior” (ticket selection), “data-viovendi-data-step-behavior” (attendee and booking data), or “data-viovendi-payment-step-behavior” (payment).
The most common use case for this solution is to skip the ticket selection for simple events with only one ticket category. Here you can send the booker directly to the second step for data entry (or for checking the prefilled data). For transparency reasons, it usually makes sense to give the booker the opportunity to check his data in the second step.
For the third step, the payment option (“data-viovendi-payment-option”) and the acceptances to all terms and conditions (“data-viovendi-term-accepted”) must be prefilled additionally. This solution makes sense if you have integrated the booking process into another process, such as on-site booking process or if bookings are created internally by employees for customers. In any case, make sure that you make the terms and conditions available to your bookers.