Invitation list: Track the registration status of specific contacts
![]()
![]()
Pro and Enterprise users can use the invitation list function to evaluate the reactions of their contacts in relation to a specific event in general and to request information for individual contacts. In addition, the invitation list allows you to divide your contacts into new contact groups with just a few clicks, based on their current status, and use them as recipients of targeted follow-up campaigns, for example.
Watch our short tutorial video from the initial launch of the feature in 2020 here:
1. Basic idea of the invitation list
The feature allows you to monitor selected people you would like to have as attendees of your event during the registration period by adding them to your invitation list as one or more contact groups.
The invitation list combines all the statuses that may be available in doo for a contact in relation to a specific event: any responses to email invitations sent via doo, the registration or cancellation status of the contact for your event, and any check-ins via the doo standard check-in solution.
The online overview of the invitation list then shows which contact is currently in which status, such as: Has the contact already been invited? In case you have invited them via a doo e-mail message: How did he react? Has he already registered or cancelled his registration? Did he finally participate in the event?
2. Recommended settings for optimal use of the invitation list
In order to take full advantage of the invitation list, we recommend it especially with the following settings:
- The invitation list is especially recommended for those organizers whose events are aimed at an already known group of people whose contact data is available in the doo contact center.
- It was designed for users of the doo Email Manager and allows them to track the status of their contacts from invitation to check-in.
- In event creation, specify that at least the name and email address must be provided on attendee level. Only then can the attendee status of the corresponding contact be displayed in the invitation list.
- The invitation list is only really meaningful if each contact only books one ticket per event, meaning that an individual email addresses is entered for each attendee.
3. Setting up the invitation list
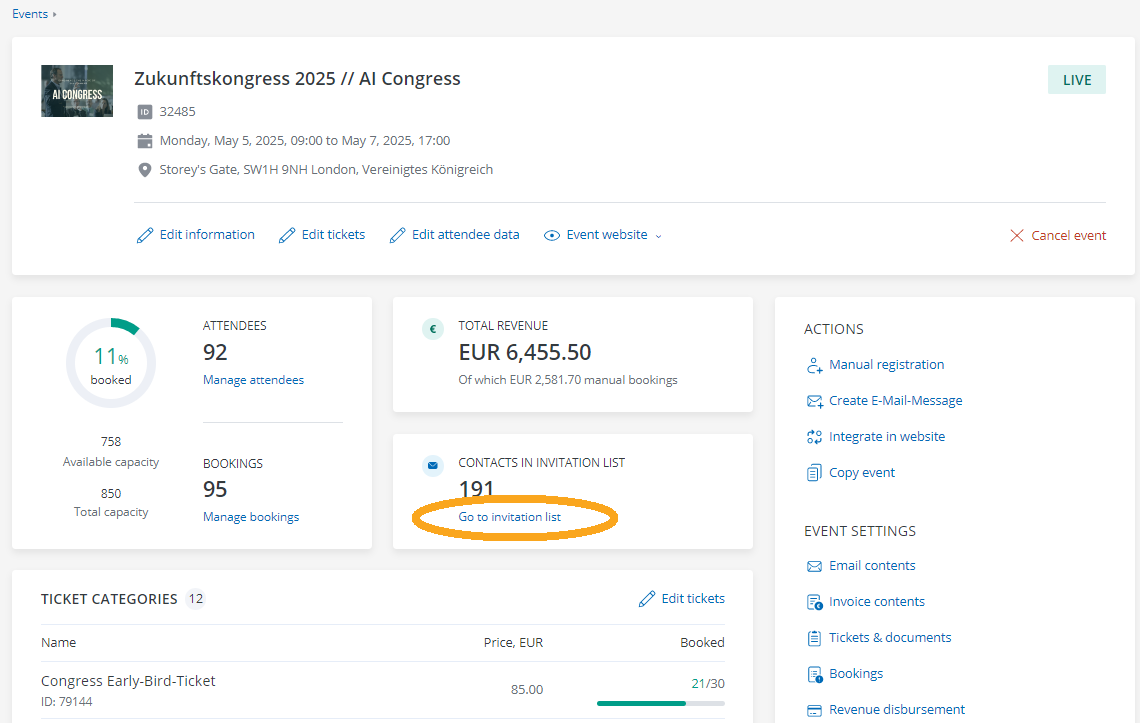
The invitation list can only be created after an event has gone live. To do this, open the event details via the event overview and click on “Go to invitation list” in the middle of the page.
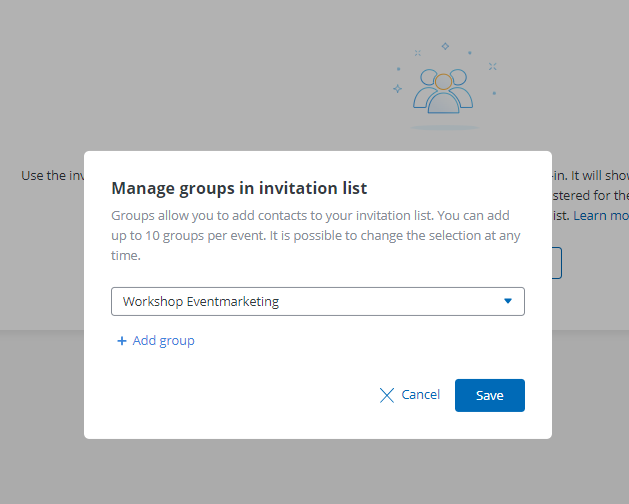
On the page that opens, click on “+ Add groups to invitation list” and select the desired contact group whose registration status you would like to evaluate in the invitation list. You can select up to 10 groups via “+ Add group”. How to create contact groups in doo to prepare the inviation list is explained here.
If a contact belongs to more than one of the selected groups, he will only appear once in the invitation list.
Any changes (adding/removing contacts, renaming groups) that made in the contact center to one of the contact groups assigned to an invitation list are automatically applied to the invitation list. If a contact group is deleted in the contact center, the corresponding contacts are also removed from the invitation list, as long as they do not belong to another group that is still assigned to the list.
4. How to evaluate your invitation list
4.1. Number of contacts by status
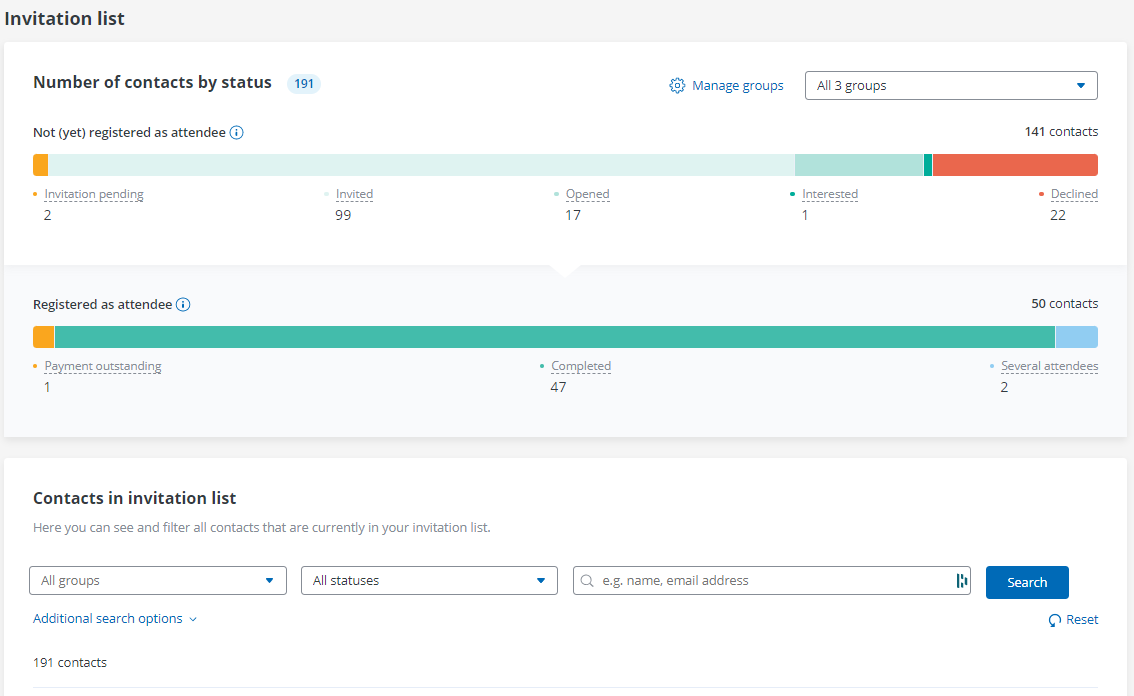
After you have selected the desired contact group(s), all its contacts are transferred to the online view of the invitation list and grouped according to their respective status in “Not (yet) registered as attendee” and “Registered as attendee”. The explanation of the individual statuses can be found later in this article.
You can use the drop-down menu in the top right-hand corner to display the graphic for a single contact group. You can add or remove contact groups to or from your invitation list at any time by clicking on “Manage groups” in the top right-hand corner – up to ten contact groups can be evaluated simultaneously.
4.2. Filter contacts in invitation list
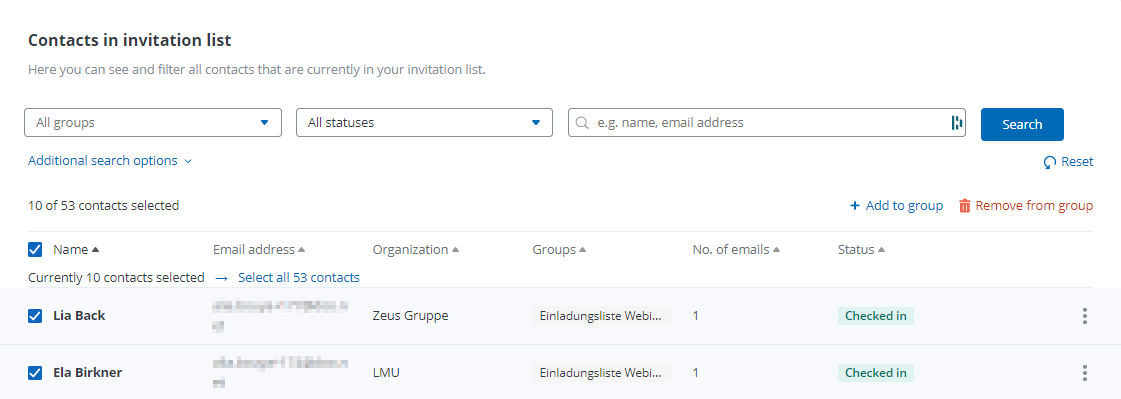
Below the graphic, all contacts in your current invitation list are listed, sorted by last name. In addition to the contact’s name, email address and organization, you will also see the doo contact group, the number of messages sent to the contact via the doo Email Manager for this event, and their current invitation status.
You can filter the overview as you wish, for example by selecting only the contacts of a specific group, with a specific status or with a specific email address. “Additional search options” allow you to further refine the overview by using one or more filters, e.g. by city, the contacts’ email permissions, or any custom contact data fields you may have created.

4.3. Explanation of the status indications in your invitation list
Your contacts can pass through a variety of statuses during the course of event registration. The following lists all the statuses that are possible if you use all doo functions to their full extent. If you do not use individual features, such as the doo Email Manager for sending invitations or the check-in function at the entrance, the corresponding statuses will be dropped accordingly from your list.
The “highest possible” status with regard to registration is always displayed, i.e. the status that is most relevant for your event planning. For example, a contact who was invited via doo email message, opened the message, clicked the registration link, and completed a registration will be listed as “Completed”. If he or she is checked in online on the day of the event, the status changes to “Checked in” accordingly.
Due to the large amount of data that is processed, status changes may be displayed in the invitation list with a delay of several hours.
4.3.1. Contacts not (yet) registered as attendees
Contacts from which no booking has yet been made are considered as not yet registered. The respective status results from the e-mail activities of any doo e-mail messages sent or manually set status updates. Contacts that have not yet been registered can have the following statuses:
- Invitation pending: The contact has not yet received an invitation via a doo e-mail message and has not yet been manually set to the status “Invited”.
- Invited: The contact has received at least one invitation via a doo e-mail message or has been manually set to “Invited” but has not yet responded (any bounce messages, complaints or unsubscriptions are not shown in this overview – these can be seen in the e-mail activities.)
- Opened: The contact has opened at least one doo email message for the event.
- Clicked: The contact has clicked on a general link (not on the registration link) in at least one doo email message.
- Undecided: The contact has clicked on the possible link in a doo email message or the status has been manually set to “Undecided” in the overview.
- Interested: The contact has clicked on the registration link in a doo email message, but has not yet completed a booking.
- Passed on: The contact has made a booking in response to a doo email message, but is not a participant. This could mean, for example, that the contact is a booker but not an attendee, or that he has registered someone else.
- Canceled: The contact has clicked on the cancellation link in a doo email message or the status has been manually set to “Canceled” via the overview.
4.3.2. Contacts registered as attendees
A contact is considered as registered as a attendee if at least one registered attendee for the event is assigned to him. Depending on the functions and settings you use for your event, the registered contacts can have the following statuses:
- Pending approval: The booking still requires manual approval by you or is flagged.
- Payment outstanding: An active booking exists for which payment has not yet been completed.
- Completed: There is an active booking (for paid events with completed payment) – the attendee(s) is/are successfully registered.
- Checked in: The contact was successfully registered for the event and has attended (checked in using doo Check-in).
- Several attendees: More than one attendee is assigned to the contact, therefore no clear assignment to a status is possible. If you open the contact in the contact center, you can see how many tickets he has booked for the corresponding event. For more information on the individual attendees, see the attendee overview.
- Rejected: The contact had a booking with manual approval that was rejected.
- Canceled: A booking existed for the contact but was canceled.
5. Manage your contacts in the invitation list
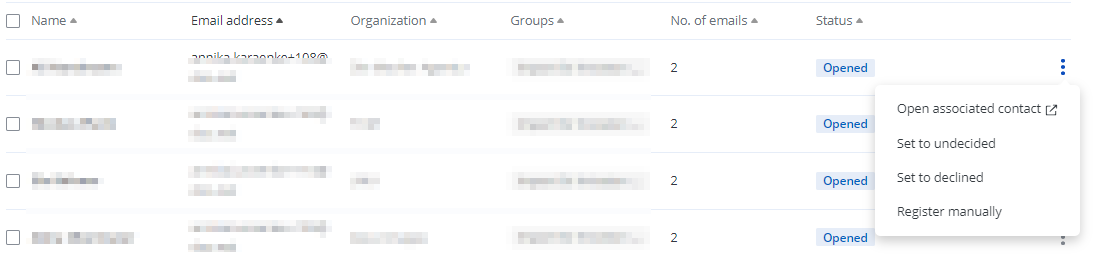
If you click on the three dots in the last column of a contact from your invitation list, a drop-down menu will open, allowing you to perform various actions. For example, you can go to the corresponding contact details page, open the the corresponding booking details or start a manual registration.
5.1. Manually changing the invitation status
Depending on the invitation status of the respective contact, you can manually change the invitation status, e.g. set a contact to “Invited” or “Cancelled”. This is useful, for example, if you did not invite the contact via a doo email message but by another means such as verbally, by letter or by using an external campaign tool. The manually set status then overwrites the previous status, but can also change again afterwards if the contact takes another action.
Important: There is no history of manual changes – the latest status is always displayed.
5.2. Creation of contact groups for follow-up communication
If you use the doo Email Manager for sending invitations and you plan to follow up the first invitation campaign with further invitation reminders depending on the response of the recipients, we recommend that you add the recipient contact group(s) to the invitation list after the invitations have been sent.
If you would like to send a further message at a later date, for example to all contacts who have not yet responded to the invitation, you only need to filter the invitation list by the status “Invited”. You can then select all filtered contacts using the checkbox in the first column of the list (if your filtered overview extends beyond the first page, expand the selection using the corresponding checkbox) and assign them to a new group, which you can then use for the e-mail reminder. You can proceed accordingly, for example, to write to all interested or undecided contacts or to all contacts with a successfully completed booking.