The attendee overview
The attendee overview provides you with an overview of your attendees. For example, you can search for attendees, check them in, add them to contact groups, create documents, or export the data.
To access the attendee overview, go to “Manage attendees” in the event details or select the menu item “View attendees” of the corresponding event in the event overview.
1. The attendee overview
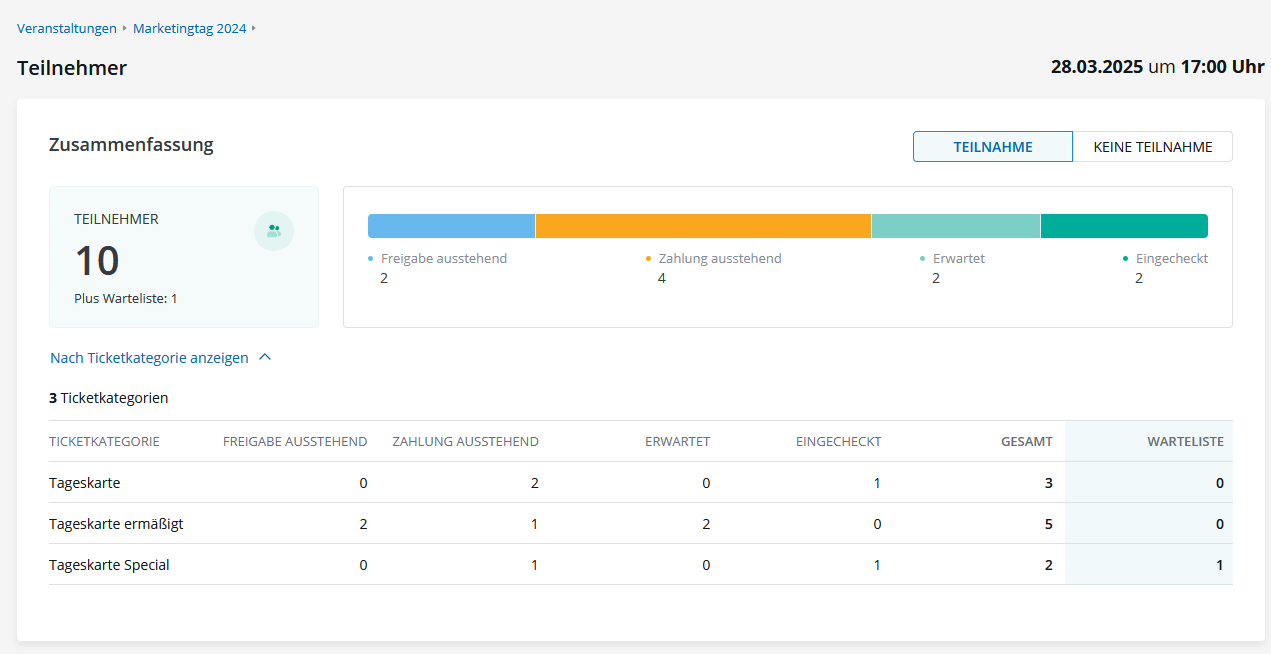
The attendee overview consists of two parts: the summary and the attendee list. Through the attendee list, you can also access detailed information about each attendee.
The summary is displayed as a status bar chart, showing the attendees of your event. By default, the focus is on attendees with an “active” status as well as those who have not yet been confirmed for the event (e.g., approval pending or still on the waiting list). If you would like to see who has cancelled, been declined, or removed from the waiting list, you can switch to the “Not attending” tab.
If you need a breakdown by status and ticket categories, you can expand the summary. To do so, click on “Show by ticket categories”.
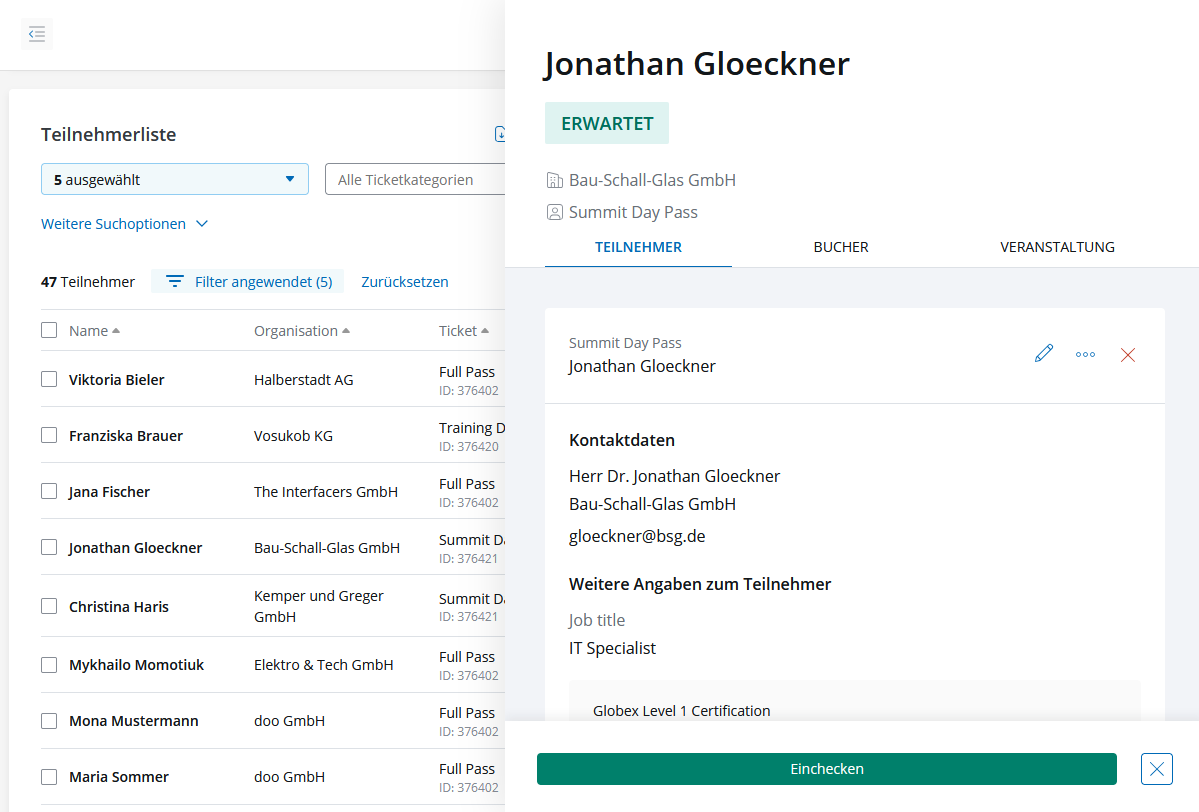
In the lower part of the attendee overview, you’ll find the attendee list, which displays each attendee individually. Here, you can filter attendees by status, ticket categories, attendee data, and booking information. By default, the list is pre-filtered – just like the summary – to show only those attendees who are (potentially) attending the event. If needed, you can adjust the filters to suit your requirements.
Important: If you did not request attendee data during the booking process, the fields “Name” and “Organization” will remain empty in the overview. In most cases, attendee data is more relevant for planning and evaluating an event than the booker data. We therefore recommend that, in addition to the mandatory information at the booker level (required for sending booking confirmations or invoices), you also collect at least the name and email address at the attendee level (i.e., for each ticket booked). You can find all information on booking and attendee questions here.
When you click on an attendee, the attendee details open in a side panel. There, you can view and edit all attendee data. You will also find information about the booker and the event.
1.1. Meaning of the Different Attendee Statuses
Expected: Expected attendees have a valid ticket (even if you are not using PDF tickets) and can be checked in, but have not yet been checked in. The attendee’s booking is active. For paid bookings, payment is usually completed. An exception is the “purchase on invoice” payment method via our payment provider Novalnet. In this case, tickets become valid immediately after purchase, regardless of whether payment has been received. An overview of available payment options can be found here.
Checked in: The attendee has either been checked in by scanning the QR code on the ticket or manually in doo, and has therefore actually attended the event. Only attendees with the previous status “Expected” can be checked in. If someone is checked in by mistake, the check-in can be undone in doo using the Check-in button. If a booking is cancelled after the attendee has already been checked in, the attendee status remains Checked in. If the check-in is undone in this case, the status changes to Cancelled.
Payment outstanding: The payment for the attendee’s booking is still outstanding, and payment is required for the ticket to be valid. This applies to bookings where the payment method has not yet been selected, the booking is still being processed, or the booker has chosen prepayment and the system is waiting for the payment to be received.
Approval pending: The associated booking is in the manual approval process and is either marked as “Approval required” or “Flagged”. Via the three-dot menu, you can access the booking details and approve, reject, or reserve the booking.
Waiting list: If the waiting list option is enabled in the event settings and bookings have already been added to it, these attendees will appear with the status “Waitlisted”.
Dropped: The attendee was on the waiting list but has since been dropped from it.
Rejected: If the booking approval was rejected, this status will be shown for the attendee in the overview.
Cancelled: Attendees whose bookings were fully cancelled or who were removed from a booking as part of a partial cancellation.
Note: Most statuses—except for Checked in—are linked to the booking status. To change the status, go to the booking details. There, you can approve or decline a booking, move someone from the waiting list, or cancel an attendee or the entire booking. For the latter, you’ll also find a shortcut in the attendee management options.
1.2. Filtering the Attendee Overview
Using the quick filters, you can filter your attendees by status or ticket category, or use the free-text search field to search by first name, last name, organization, email address, or ticket hash.
If you want to apply more detailed filters, you can use “More search options” to search by specific attendee or booking data.
Multiple filters are combined using the “AND” operator, meaning you will only see results that match all selected filters. Using filters, you can, for example, display:
- All attendees from a specific country
- All attendees who booked a specific product
- All attendees belonging to a specific booking number
- All attendees whose booking is unpaid and was made before a certain date
1.3. Recording Attendance with the Check-in Option
In the second-to-last column “Check-in”, you can check in attendees or undo a check-in. This allows you to record attendee presence on-site using the attendee overview. Check-in is only available for valid tickets where the booking has been completed.

doo offers several option to manage check-in on-site. Addionally to the option in the attendee details, you can for example scan the QR code, use the doo On-Site Management or work with a On-Site Service Partner. For more information, please refer to the help center section “On-Site and Attendance”.
Regardless of how you check in the attendee, the check-in time is recorded in all cases. Please note that when scanning QR codes, the attendee overview does not update automatically. To see the current status, refresh the page using your browser.
If you undo the check-in, the check-in including the timestamp will be deleted. The attendee can then be checked in again.
1.4. Attendee management options
In the attendee details as well as via the three dots in the last column of each row, you will find various options for attendee management:
1.4.1. Edit attendee data
In the attendee details, you can edit the person’s information.
1.4.2. Open booking details
Access the associated booking, for example to change the booking status via the booking details, view the invoice, or perform a (partial) cancellation. Instructions on how to edit attendee and booking data can be found here.
1.4.3. Open linked contact
If the attendee is linked to a contact in the contact center, you can open it to view full contact details or activities such as previous participations or sent email messages.
1.4.4. Change linked contact
If an attendee is not linked to the correct contact, for example because they used a different email address during booking, you can change the assignment using this option: In the pop-up that opens after clicking the option, you can search for the new contact you want to assign the attendee to and confirm the assignment.
1.4.5. Download ticket/wallet
Download the attendee’s PDF ticket or Apple Wallet pass.
1.4.6. Download custom document
If a custom document such as a certificate has been generated for the attendee, you can download it here for a specific attendee. At the top of the attendee overview, you also have the option to download all generated documents for the event as a ZIP file. All information about personalized documents can be found in this article.
1.4.7. Cancel attendee
To cancel the attendee, you will be redirected to the booking details. If there are multiple attendees per booking, you can cancel the selected attendee as a partial cancellation.
1.4.8. Open check-in confirmation page
If you have commissioned a custom check-in confirmation page with doo, for example to use it for badge printing on-site, you can also open it via the attendee overview.
1.5. Bulk actions
To perform an action for multiple attendees at once, select the respective checkboxes in the first column of the list.

The following options are available as bulk actions:
- Check-in (if the attendee status is completed).
- Add to a contact group
- Remove from a contact group
- Create documents (if you have configured custom documents for the event)
- Delete documents (if you want to delete already created custom documents)
2. Add attendees
You can manually register additional attendees yourself by clicking on the “Add attendee” link at the top right of the page. All information on manual registration can be found here.
3. Download the attendee list
You can download your current attendee list as a CSV or Excel file at any time by clicking on the “Export attendees” link. If you have filtered the overview , only the data from the filtered view will be exported.
More details on what the attendee list looks like and how it differs from the booking overview can be found here.