Forms – Set up surveys and feedback requests for your attendees
With the doo forms feature you can easily create, send and evaluate surveys within the doo application. This feature allows you to quickly and effectively perceive the voices of your participants both before, during and after your event to guarantee the best possible implementation.
doo forms are an optional feature that can be activated for your doo account for a monthly fee. If you are interested in an offer, please contact your doo contact person or our Support Team.
This article is divided into the following sections:
1. Creating a form
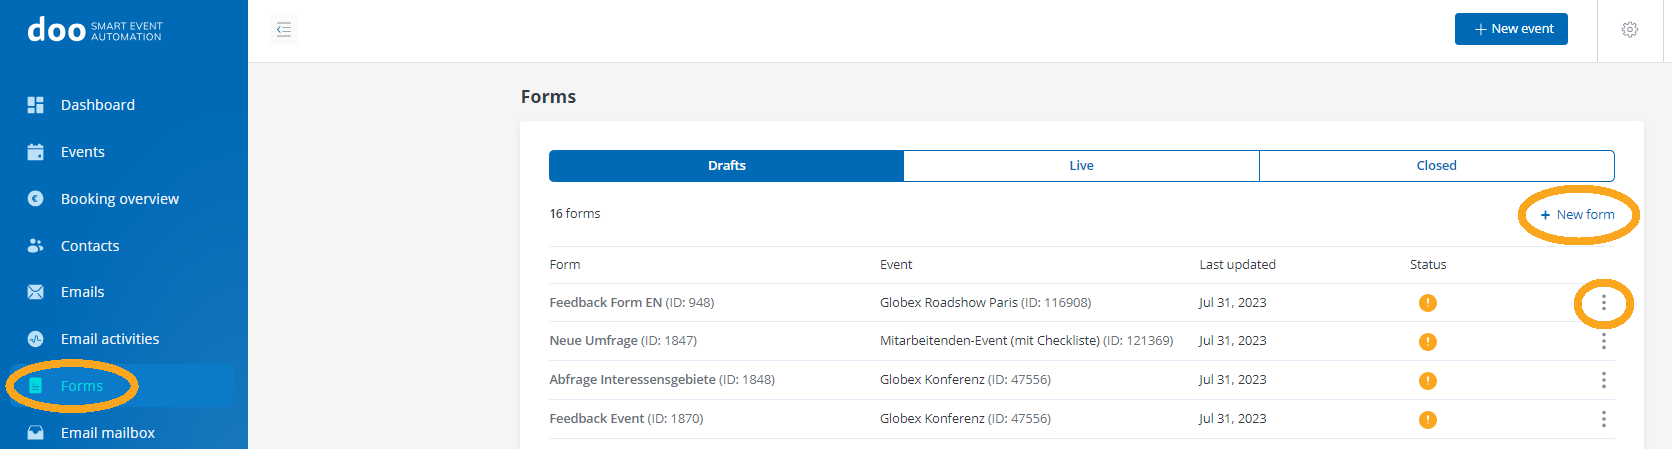
After we have activated the Forms feature for your doo account, click on “Forms” in the left menu bar. Here you will find an overview of all your forms. Via the tabs you can switch between your drafts, the forms that are currently live and editable and the forms you have already closed.
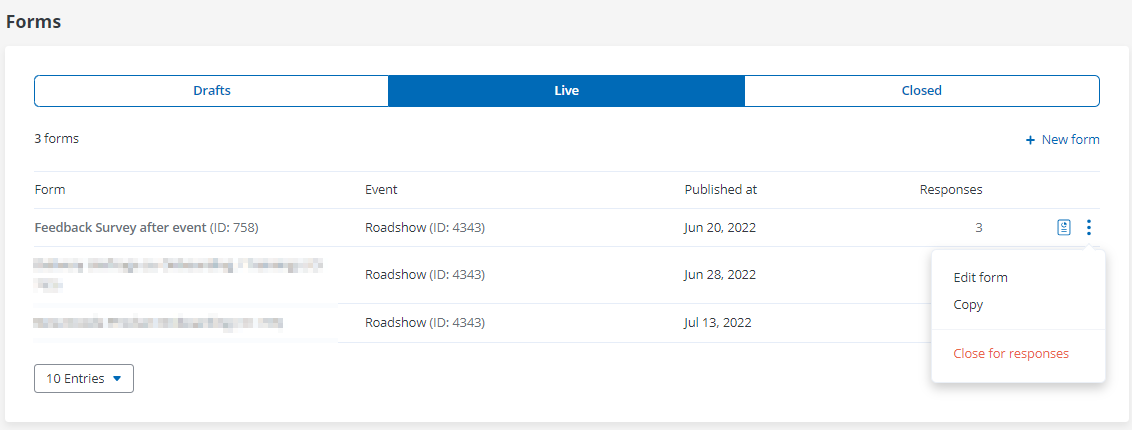
Click “+ New Form” to create a new form. Alternatively, you can copy or edit an existing form by clicking on the three dots next to the form and selecting the appropriate action.
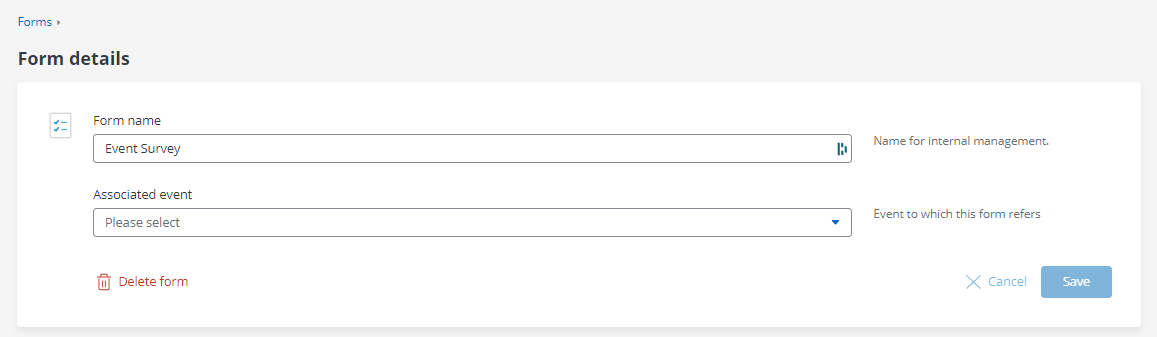
Assign a name for the internal administration of your form and select the assigned event from the dropdown selection.
1.1 Define questions
Enter a short introduction (limited to 600 characters) that will be displayed to your attendees to start the form. It should clarify the reason for the survey and motivate your attendees to take part in it.

Afterwards, you can create your first question by clicking “+ Add question” and selecting the type of question.
There are three types of questions you can create in your form.
- The Open question creates a single or multi-line text field for free input. In a new window you can name the question and describe it further if necessary. To save the question, click Apply.
- Use Multiple Selection to create questions where your attendee can choose from multiple answer choices by clicking a checkbox. Create an answer choice by clicking Add Answer Choice. To remove an answer choice, click the cross next to the desired answer. Remember that within a question, multiple answers can be clicked at the same time by an attendee. Design your answer choices accordingly or use the description if you want to get only one answer from each attendee.
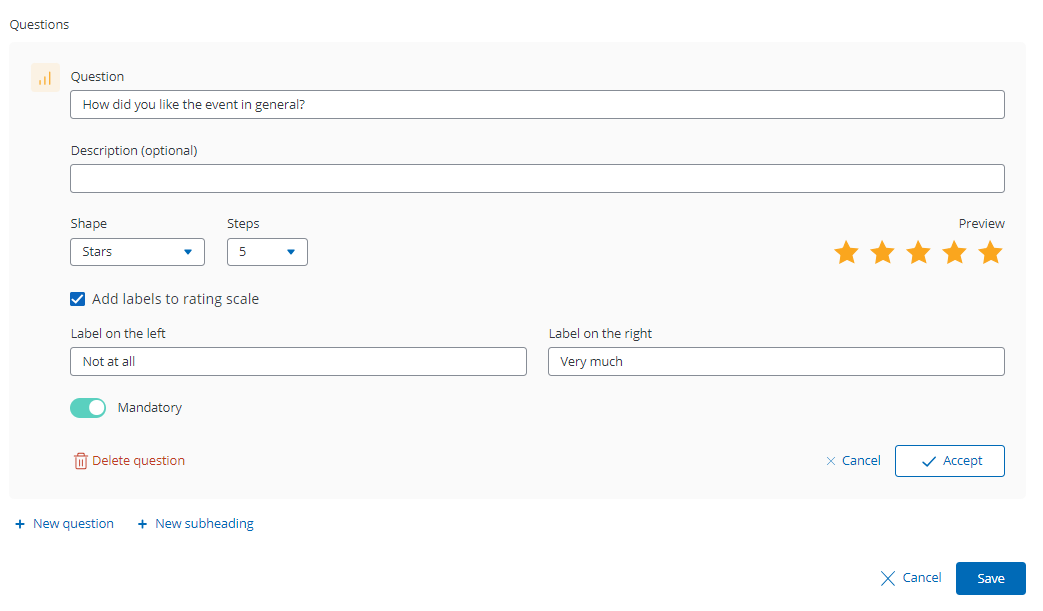
- The Rating function provides a number scale or star rating for your event. Under Form you can select whether stars or numbers, and under Levels how many of these should be displayed. To make the scale clearer, you can add labels to the left and right of the stars (or numbers) with the respective extremes of the scale, e.g. using the school grading system.
After having selected the question type, you can enter the question, optionally an additional description, define further settings and decide whether the question should be mandatory. Please confirm your entries by clicking on “Accept”.
After you have created a question, it will appear in the overview and you can proceed by creating further questions or edit the existing ones.
 Via the icons on the right, you can edit existing questions, duplicate or delete them.
You have the possibility to structure your questions by using subheadings and thus give your attendees a better overview. To do this, select “New subheading” and add any heading. The position of the heading can be adjusted via drag & drop using the dots on the left side.
To edit the order of the questions, click on the rectangular dots to the left of a each question and drag and drop them to the desired place. When you are satisfied with your questions, click “Save”.
1.2 Messages
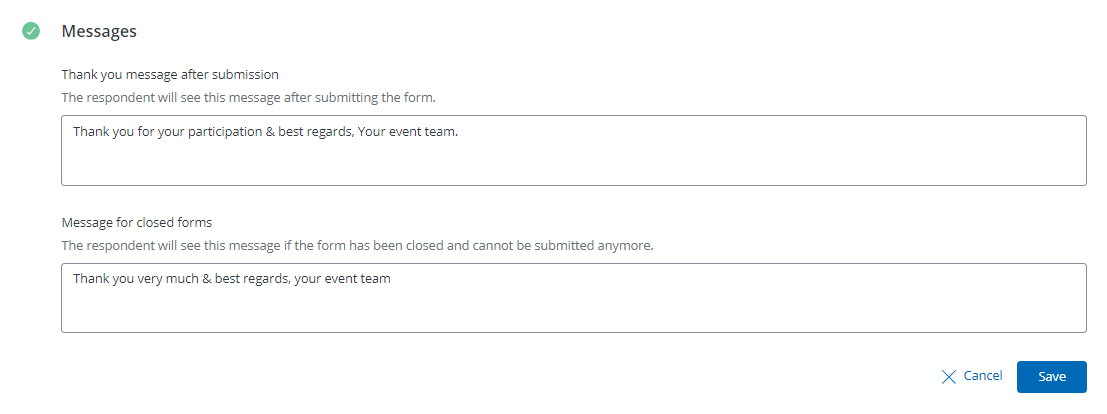
Define whatmessage you want your participants to see on the screen after you have filled out and submitted the form – for example, you can briefly thank them for participating in the survey. You also need to define a message here in case a participant wants to access a survey that has already been completed.
1.3 Publish form
Until you have published a form, it is temporarily stored in the drafts and can be further edited by you at any time and then published.
After you have defined all questions and messages, please click “Preview” to you can make sure you are satisfied with the final result. If the form meets your requirements, click “Publish”. The form will be available to your attendees if you share the link with them. Of course, you can still make changes to the questions and settings (title andassociated event) after publishing a form.
Attention: If you change questions after publishing, this will affect the evaluation of the form. For more information, please refer to the section 3 of this article.
2. Distribute a form among your attendees
There are three ways to distribute your form among the attendees of your event. Which one you should choose depends on the purpose of your survey.
For all three options you need the URL to your form. You can find it at the top of the form details between the “Preview” button and the option to edit the settings of your form. Copy the URL from here and paste it into the right place as described in the following distribution options.
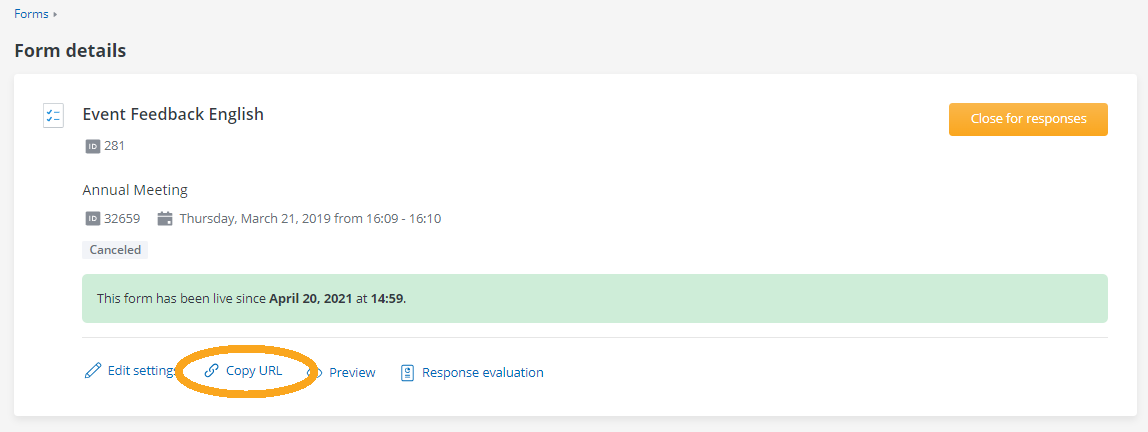
Please also note that you can only copy the URL after your form has been published.
Tip: You can also put the FormID in place of the 000 in this URL: https://doo.net/de-de/forms/000
2.1. Booking emails
If you want to conduct a survey before the event, you can embed the URL of your form in the automatically generated emails that are sent after the booking. To do this, customize the content of the desired email messages and integrate the URL into the text of the email. For more information on editing automatically generated emails, click here.
2.2 Email message
To send the form to specific groups of attendees , you can include the URL into an email campaign. This is for example useful if you want to conduct a survey after an event. You could for example send a campaign to all attendees who have checked in for your event. You can see how to compose and customize email messages here. In this article you’ll learn how to create a contact group from the attendees of an event in order to contact them via email message.
Tip: You can also pre-populate forms with existing contact information or include a points/star rating into the email. You can find more information about this in section 4 of this article.
2.3 Website
To allow attendees to access the form directly from your website, either enter the URL to the form on your website as a link (e.g. embedded in a button or text) or import the form as a widget.
To import the form as a widget, add a booking widget to the place in your web page where you want the form to be. After that, you just need to append the vv_form_id parameter to the URL of your web page. How to insert a booking widget is explained here.
Example: You want to insert the form with ID 000 as a widget into the website https://examplewebseite/subpage. You have already integrated a booking widget for the event linked to the form in the page. Therefore, change the URL to https://examplewebseite/subpage?vv_form_id=000
Tip: You can find the ID of the form in the form overview in brackets after the title of the form.
3. Evaluate a survey
If you do not want to collect any more responses for your form, click on the three dots next to the form title in the form overview, in the “Live” category, and select “Close for responses”. You can also see here directly, how many attendees have already taken part in the survey and switch to the response evaluation.
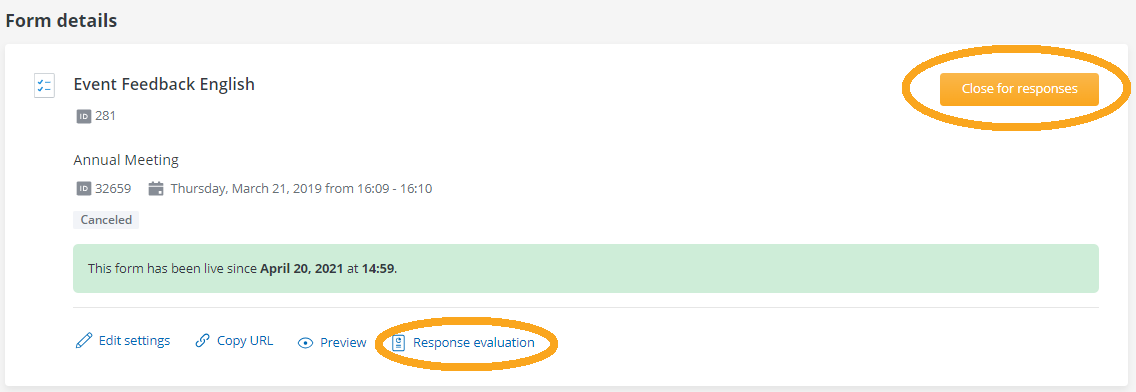
The same is also possible via the form details. To do this, click on the yellow button “Close for answers”. After that, every participant who accesses the URL of the form will see the message you defined in point 1.2. You can find the statistics of your survey by clicking on “Response evaluation” in the form details.
3.1 Response evaluation
In the response evaluation, you can see for each question, how many of the total participants responded to a question.
For an Open Question, it also shows the percentage of survey participants who responded to that question.

For Multiple Selection, each answer choice shows how many respondents chose that answer. It also shows the percentage of participants who chose one answer out of all participants who answered that question.
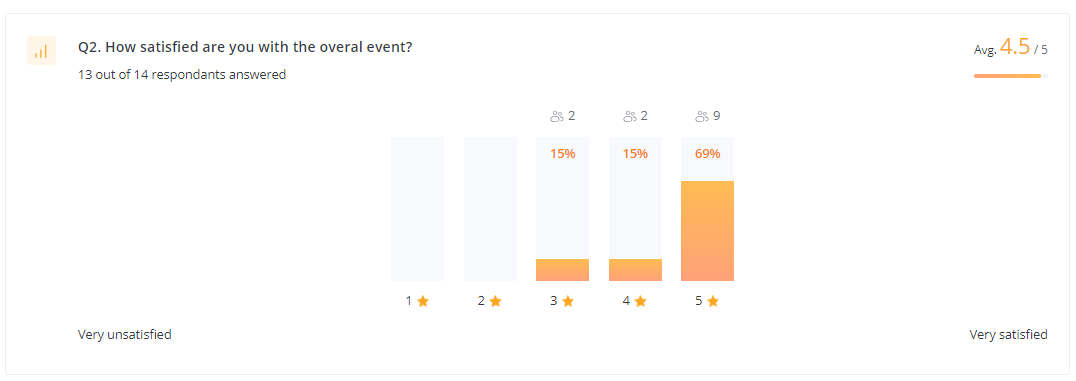
For the Rating, the average number of points or stars given for the question is shown. Also, a bar graph shows both how many participants chose each rating and the percentage of participants who answered that question who chose that answer.
3.2 Changes to active questions
If you make changes to questions after you have already published the form, the original question will be grayed out and displayed at the end of the answer evaluation. This means that the answers that were previously given for this question will not be lost.
The changed question is now displayed in its new state in the form and collects new answers that are not related to the old answers. Please bear this in mind for your final evaluation.
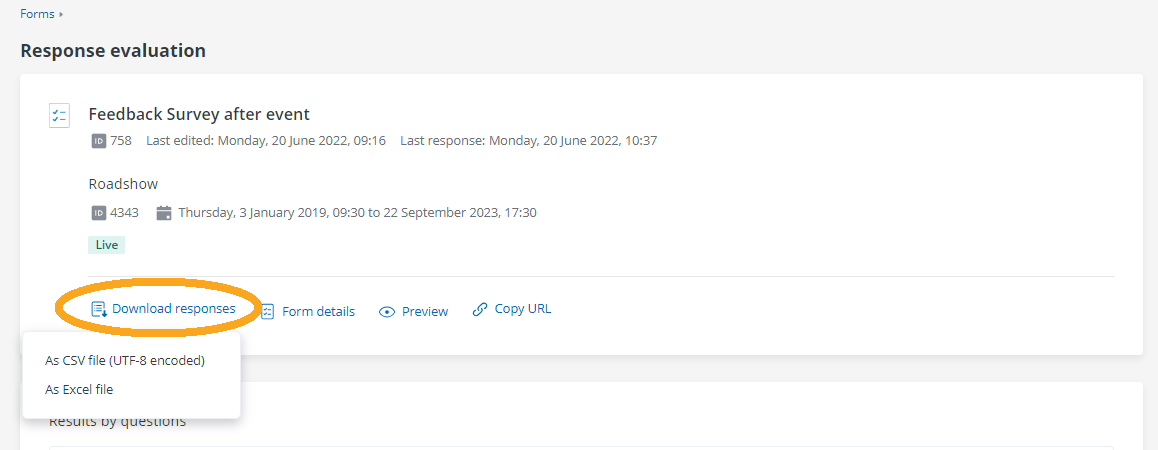
3.3 Download answers
If you need more detailed information than in the online view, you can additionally download an evaluation.
To download the answers to your form, click on “Download answers” in the answer evaluation and export the data either as a CSV file or as an Excel file.
4. Prefill a form
This is a step-by-step guide on how to prefill a form using an email message. In doing so, the values you define in the URL are already entered in the form when a subscriber opens the link. The values can still be changed by the attendees afterwards.
Note: Questions cannot be skipped in the prefill process and must be defined in the order they appear in the form. Keep this in mind when creating the form.
1. Create an event
2. Create a form and remember the ID of the form
3. Create a new email message for your event and open open the editor to customize the content & design of the email
4. Add multiple icons (for example several stars for a star rating) to your design. The number of icons should match the rating scale of your form.
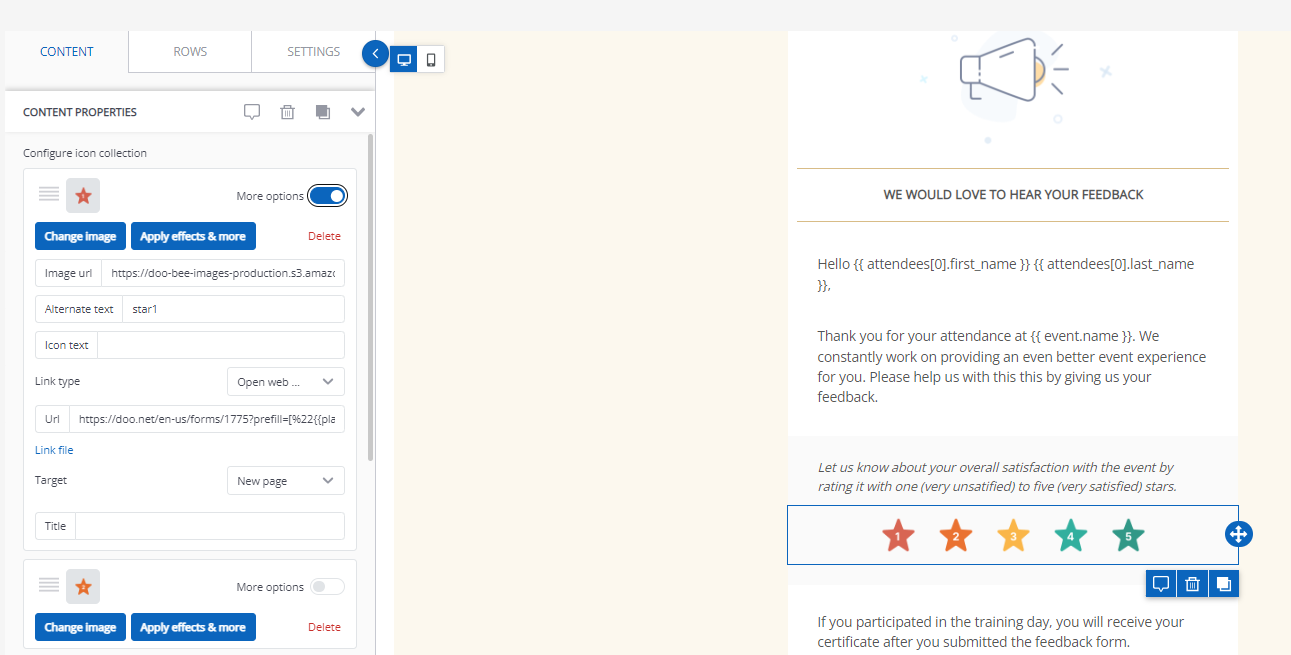
Tip: You can also add one simple button in your email if there is no rating scale in your form. Then apply the steps below to that button.
5. For each icon, enable “More options”. An input field for URLs will show up into which you can enter the URL your subscriber should be redirected to when clicking the icon.
6. Insert a URL with the parameters explained below
In the following example, the form should be prefilled with the following attributes when clicking on the fourth star of the email.
| Name | Max Mustermann |
| E-Mail-Adresse | max.mustermann@doo.net |
| Star rating | 4 out of 5 Stars |
| Multiple Selection: | The choice 1 and 4 |
| Form ID | 48 |
For this example, the following URL needs to be created using Liquid Code. Customize the code pieces as you wish by replacing the bold values. You can get more information about liquid here.
https://doo.net/en-us/forms/48?prefill=[%22{contact.first_name | default: "Ms/Mr" | url_encode }} {{contact.last_name | url_encode }}%22,%22{ contact.email | url_encode }}%22,4,[1,4]]
Explanation of the code components:
- 48
- Form ID
- {{contact.first_name | default: “Mrs/Mr” | url_encode }} {{contact.last_name | url_encode }}
- Example for an open question (Here first and last name)
- Part must be enclosed with %22 … %22 which evaluates to “… ” evaluates to
- Liquid coded part must contain the appendix url_encode to be evaluated in a URL.
- 4
- Example for a star rating (Here 4 of 5 stars)
- Simple numeric value
- [1,4]
- Example for a multiple choice (Here answer 1 and 4)
- Specifies the position of the answers in an array (starting with 1)