Explanation of scenario examples
-
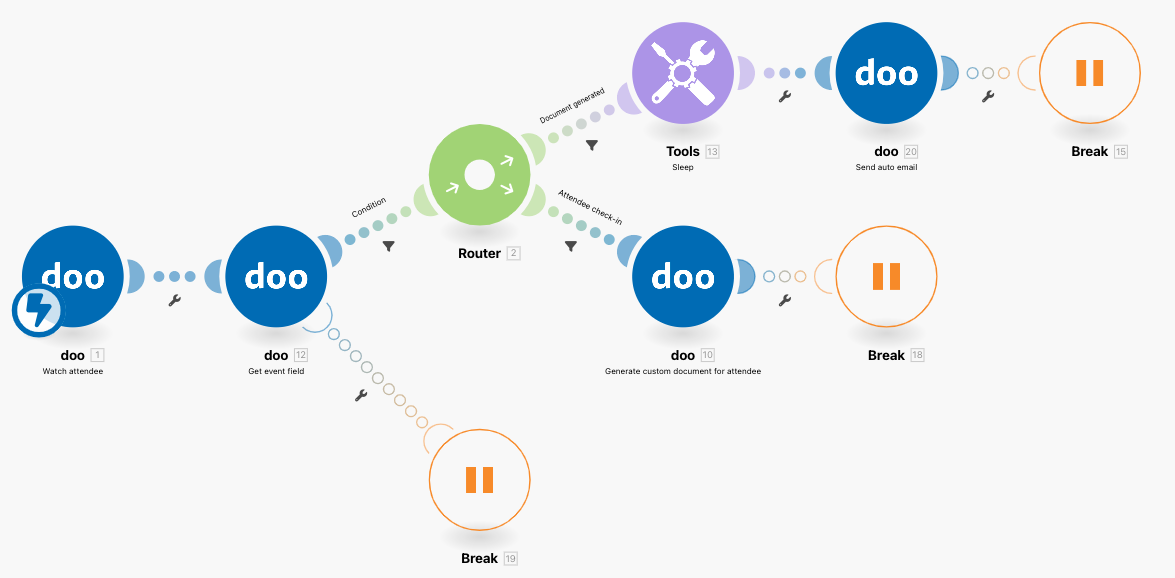
Watch attendee: Start the scenario with a “Watch attendee” module, which collects data about your attendee and pushes it forward.
-
Get event field: The module returns you the value for a specific event field that you inserted when you created the event. For this automation to work properly, you must have a custom event field where you can insert the ID of your custom document (which you can find in your organization’s settings).
-
Router: Since a certificate can only be sent if it has already been generated for the corresponding attendee, the scenario must first check whether this is the case. A router is placed for this purpose, using a filter to represent two possible routes.
-
Route 1: The document has already been generated: After you set a “Metadata = attendee_document_generated” filter, you can connect the next doo module to send the certificate, using the “Send an auto email” module, as an attachment to the correct attendee. To do this, you must select the desired auto email template associated with your custom document.
-
Route 2: The document has not been generated yet: First you should set a “Metadata:trigger = attendee_checkin” filter to check if the attendee has been checked in at all. If so, this information is passed to the next module, which then creates the document for that particular attendee. This is then sent when the make scenario is run again and the workflow goes through the first path again.
-
Break: For both routes, an “Error Handling” module should be used so that the scenario continues when a problem occurs, but at the same time is marked as a warning.
-
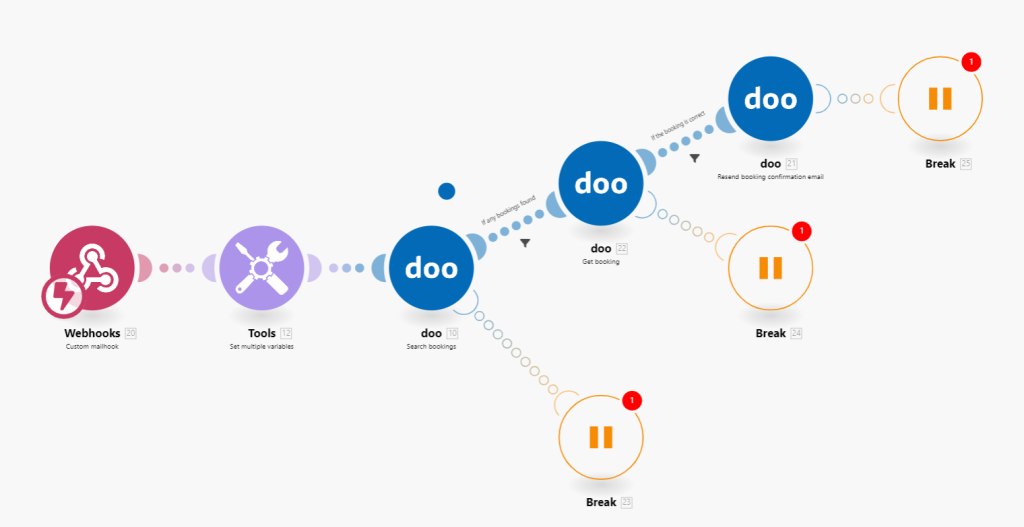
Module 1 – Webhooks – Custom Mailhook: The trigger for this scenario is a so-called mailhook. This mailhook is a unique e-mail address that is created especially for the scenario. As soon as an e-mail is sent to this address, the scenario is triggered. In the configuration of the module, click Add and select My gateway mailhook webhook. You can customize the name to better match it later in the webhook overview. The address of your webhook will then be displayed below and can be copied from there to communicate it to your bookers.
-
Module 2 – Tools – Set multiple variables: In the next step, a tool is built in to define variables that you will need later in the scenario. The email address of the sender is defined as variable “Booker Email”, so that it can be used in the further scenario process. Furthermore, after saving the scenario for the first time, the doo event ID for which the automation is to apply can be entered here under “Variable 2”.
-
Module 3 – doo – Search booking: After you have confirmed your doo organization ID for the subsequent “Search bookings” doo module, your account can be searched for the email address of the sending attendee.
-
Filter “If any booking found”: The following filter checks whether there is a booking for the e-mail address.
-
Module 4 – doo – Get booking: If yes, the next step is to query the corresponding booking data. The booking ID of the search module is mapped as input, so that the data of the booking found there is called up.
-
Filter “If the booking is correct“: The following filter checks if the booking is still active to prevent tickets from being sent out again for a booking that has already been cancelled.
-
Module 5 – doo – Resend booking confirmation email: If there is an active booking for the email address from which the email was sent to the mailhook, the following module “Resend Booking Confirmation Email” resends the corresponding booking confirmation including ticket. The booking ID is also the input for this module and is mapped accordingly.
-
Error Handling Module – Break: For each doo module, an “error handling” module is used so that if a problem occurs related to a specific email address or booking for new incoming emails, the scenario will continue to work but you will be informed about the problem via an appropriate warning.
-
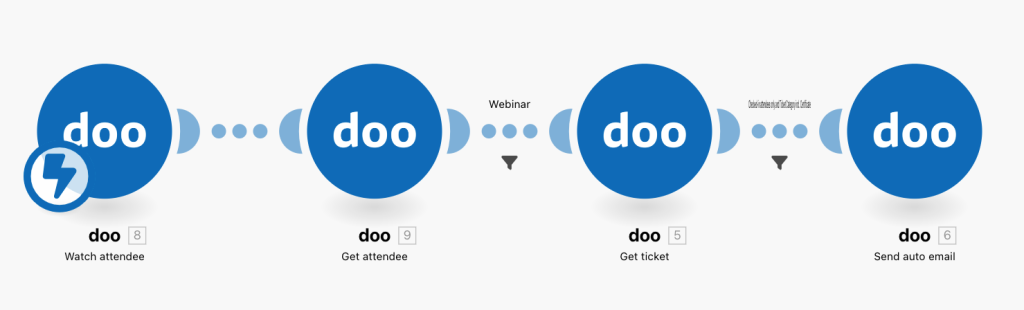
The scenario starts with a “Watch attendee” webhook, which is triggered by any modification in attendee data.
-
The trigger module is followed by a “Get attendee” module, which is needed to get all the attendee information.
-
After that a filter is added to only select attendees related to a particular event. Please click on the filter and select your Event ID.
-
In the next step, we use a “Get ticket” module to access all the ticket information. This module is only needed if you later want to filter by a certain ticket category. If not, you can skip this step.
-
The filter contains two conditions: one checks if the attendee is checked in and the other one restricts the email send-out to those attendees who have registered for a certain ticket category (this filter is relevant if you have several ticket categories and only the bookers of one of them should receive the form).
-
The scenario ends with a “Send auto email” module. In order to be able to assign the completed surveys to the individual attendee and subsequently send him his certificate, the respective order ID must be transferred to the form as a pre-fill value. To be able to match completed surveys with the corresponding attendee, we need to make sure that the order ID is prefilled into the form. To do this, the advanced settings of the module must contain a placeholder with a key called “orderID” and the value of the Booking ID from the “Get Ticket” module.

-
The scenario starts with a “Watch form response” module which is triggered whenever a new form response is saved.
-
The trigger is followed by a “Get form response” module in order to retrieve all the information about the form.
-
The following filter restricts the flow to only consider responses to a certain form. Please select the correct form ID.
-
A “Search form response answers” module follows, where the Form Response ID is mapped using the previous modules.
-
The following array aggregator bundles the order position, answer text and form response ID, which will be needed to match the filled out form with the corresponding attendee in the next step.
-
The next module “Search attendee” is configured with the search type “Attendees for booking” to get the Booking ID by accessing the answer text to the first element in the array provided, as shown in the picture.
-
The next modul “Get attendee” retrieves the attendee data belonging to the booking ID entered into the form.
-
With the “Generate custom document” module the certificate is created for the attendee, followed by a “Sleep” module which interrupts the process for a couple of minutes to make sure that the document is successfully generated before proceeding with the next step.
-
The scenario ends with a “Send auto email” module. Please adjust the settings and select the corresponding auto email with the custom document attached as well as the attendee and contact ID obtained with the previous modules.