-
General information
-
Account Settings
- Creating & managing your personal doo account
- Organization settings: Managing your account settings
- Multi-user: Working as a team
- How to reset your password
- Changing the email address of your doo account
- The doo account packages
- What can I do if a doo site does not load
- Adjusting standard labels and texts of the doo booking process
- How do I delete my account
- Payment Process: How to manage payment options
- Password Security using doo: What options are available?
-
Events
-
- Edit email contents
- Using placeholders in booking email templates
- How to adjust invoice contents
- Attendee tickets and QR code scanning
- What do doo tickets look like?
- E-mail attachments for bookers and attendee
- Certificates & Co: Create custom documents
- Define your own booking conditions
- Revenue Disbursement: Entering and editing invoice address & bank account information
- Create bilingual (multilingual) events
- Bookings with manual approval
- Create a waiting list
- Access codes and promotion codes: Discounted tickets for your participants
- doo Widgets: Integration into your own website
- doo Default Event Website and Custom Event Website
- How to create a booking process in english
- Providing flyers, event programs or direction sketches
- How does the booking process work for my attendees?
- How do I make test bookings?
- Creating exclusive registration access for selected contacts
- Delete ticket categories & change prices and sales periods after go-live
- Cancellation of events
- What are event fields and how do I use them best ?
- Shorten the booking process and prefill data: How to make the booking process as convenient as possible for bookers
- Tips for virtual events with doo
- Integration into your own Facebook page
- Event Templates: Creating templates for your events
-
Manage Bookings
- Manage bookings and attendees
- Monitoring incoming bookings
- The attendee overview
- Invitation list: Track the registration status of specific contacts
- Manual registration
- Resend automatically generated emails
- Rebooking: How to change existing bookings
- Cancellation & Refund Handling
- Booking self-service: Allow bookers to subsequently access and edit their bookings
- Download booking overview and attendee list
- Change of attendee data and invoice address
- Bank transfer: How to deal with pending transactions
- What to do, if someone has not received their confirmation e-mail or ticket
-
Contact Management
- Contacts: Introduction and Topic Overview
- Contact details: Collect cross-event contact information
- Overview contact data fields
- Managing contact data fields
- Creating contacts - How do contacts get into the doo contact center?
- Contact import - Bulk creation and editing of contacts
- Managing existing contacts
- Creating and managing contact groups
- Datamatching & Synchronization of booking data and doo contact
- Email subscriptions: Double opt-in & opt-out options at doo
- Deleting contacts
-
Emails
-
Websites
- The doo website editor: create an individual event page
- Mobile optimization: Customize your site for all your devices
- Installing different tracking tools on the website
- Creating a SSL certificat (HTTPS) to ensure data security
- Website Tracking: How to integrate doo into your Google Analytics To be Created
-
Additional Functions
- Optional Service: Refund handling via doo
- Ticket design: How to get your ticket in the desired design
- Forms - Set up surveys and feedback requests for your attendees
- Embedded Reports
- Customer specific sender emails
- Email inbox: How to manage email requests from your participants within doo
- Add calendar entries to your event communication
- Filtered cross-event widgets: How to show only selected events
- Widgets and Accessibility
-
Automations
-
Booker & Attendee FAQ
-
On-Site and Attendance
Define attendee and booking data
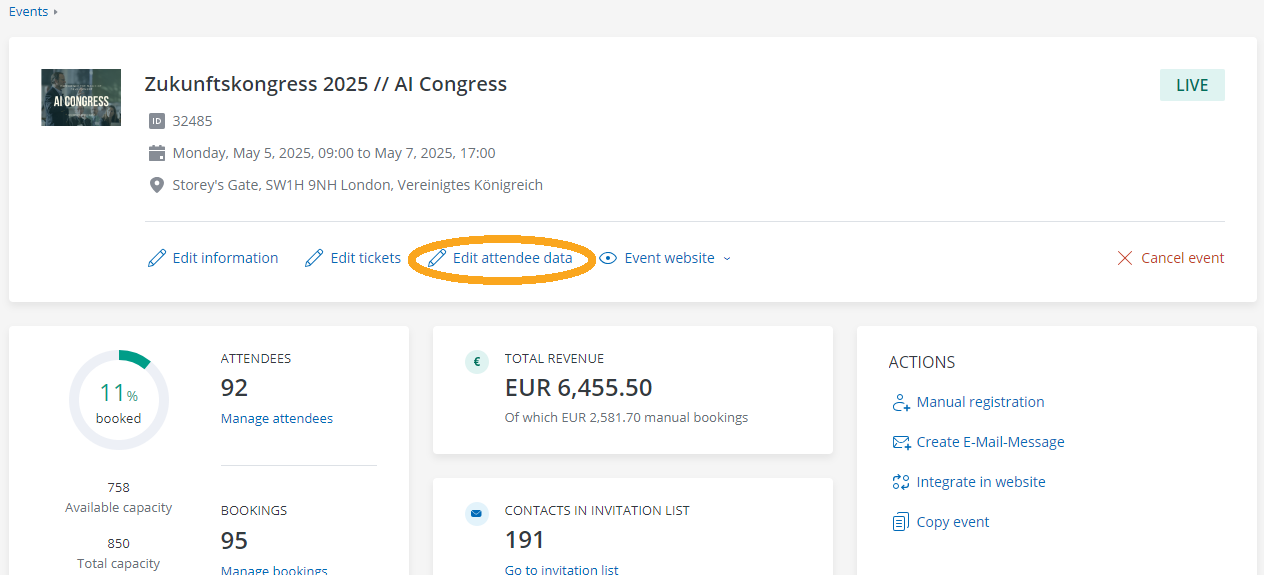
In step 3 (“Attendee data”) of the event creation process, you have the possibility to define questions that are asked in the course of the registration and that have to be answered by your bookers in order to successfully sign up for your event. For existing events, you can access the page at any time by clicking on “Edit attendee data” on the event details page.
1. The difference between booking and attendee details
doo differentiates between booking and attendee details: The questions defined under “Attendee details” are asked separately for each attendee, i.e. once per booked ticket. The questions under “Booking details” are asked once per booking and relate to the person who makes the registration and thus the person who is to receive the booking confirmation and eventually the invoice in case of paid events.
Example: The assistant of a company registers two of his colleagues for an event. In addition to the invoice address queries, further company information such as industry and number of employees is requested. Since this information relates to the entire booking and applies equally to both participants, it is queried on booker level (“booking details”). To be able to plan the event better, the organizer needs additional information for the catering and therefore asks for food preferences for each individual attendee (“Attendee details”).
2. Attendee details
The questions that are defined in the attendee details will be asked separately for each attendee, so once per selected ticket. Here you can collect information about each individual attendee such as name, organization, personal interests, special diet or participation in sub-events.
2.1. Contact Details
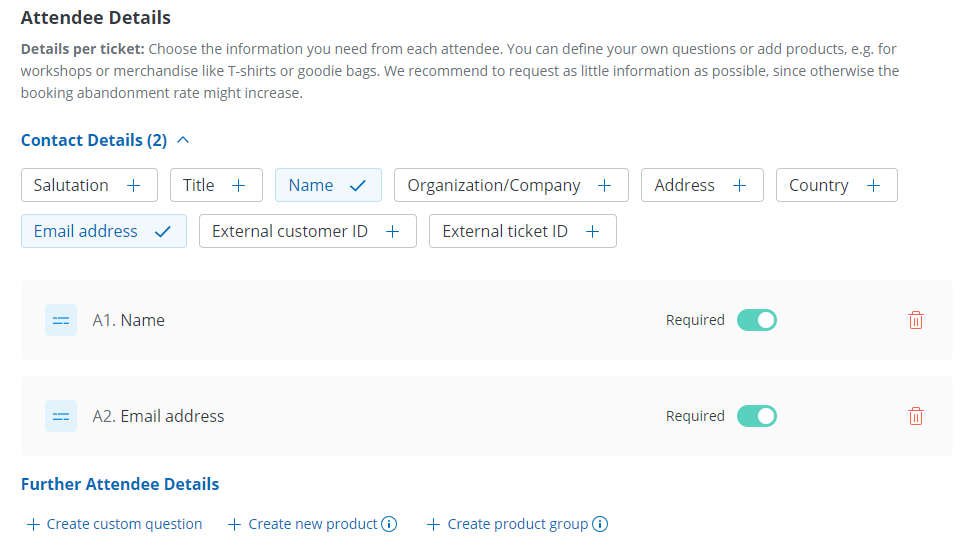
In case you activated tickets for your event and would like to display the name of the attendee on it, you should mark at least “Name” as mandatory field on attendee level, so that the booker has to enter the name of each attendee individually.
If you want to make sure that not only all bookers but also all attendees are saved as doo contacts in your contact center, please also mark the email address as mandatory field since the email address acts as identifier for doo contacts. More information about data synchronization at doo please follow this link.
To collect further standard data of your attendees such as salutation, address or organization, simply select them by ticking the checkboxes at the top.
If you display the attendee data before the booking form in the booking process of your event, your bookers have the option to copy the answers they already entered for the one attendee to further attendees as well as to the booking form. That way he does not need to enter them multiple times and can save time.
2.2. Further Attendee Details
If you would like to request further information from your attendees in addition to the standard contact details, or if you would like to offer products, you can enter this under “Further participant details”.
Tip: Maybe you know it by own experience: The longer a registration form is, the higher the risk that a booker abandons the booking process. We therefore recommend to keep the number of questions as low as possible or at least make them optional.
2.2.1. Create custom question
To get additional information regarding your attendees such as food preferences, click “Create custom question” and select an appropriate question type.
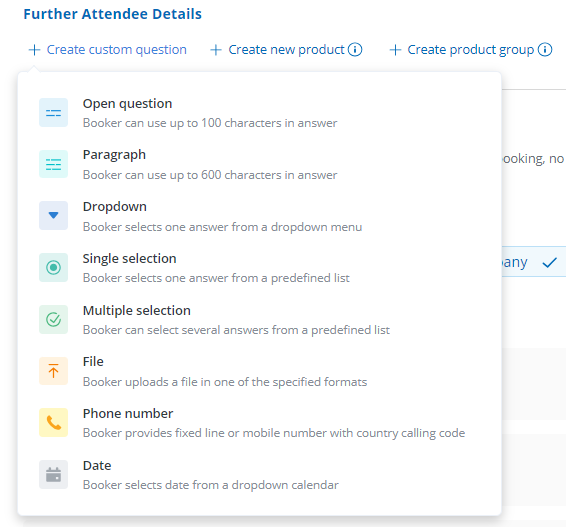
You can choose betwenn the following question types:
- Open question: small text field for up to 100 characters, e.g for phone numbers, birth dates, membership numbers.
- Paragraph: large free text field for up to 600 characters, e.g for remarks, previous knowledge
- Dropdown: like simple selection, only that the possible responses won’t be selected by checkboxes but from a list which extends when clicking on the question
- Simple selection: booker can define one answer from a predefined list by ticking a checkbox, e.g for yes/no questions or selection of room categories
- Multiple selection: like simple selection, but the booker can select more than one response, e.g “What are you bringing with you?” “Which of this courses have you already booked?”
- File upload: the booker is asked to upload a file (PDF, PNG, JPG) during the booking process e.g for trade visitor evidence, copy of a membership card or submission of a letter of motivation
- Phone number: a field in which a phone number must be entered, the entry of a country code is mandatory.
- Date: a field in which a date must be selected from a calendar, e.g. usable to query birth dates or any extra dates
In the next step, you can then enter your question, optionally with a description, and depending on the question type, add answer options that you want to give your bookers.
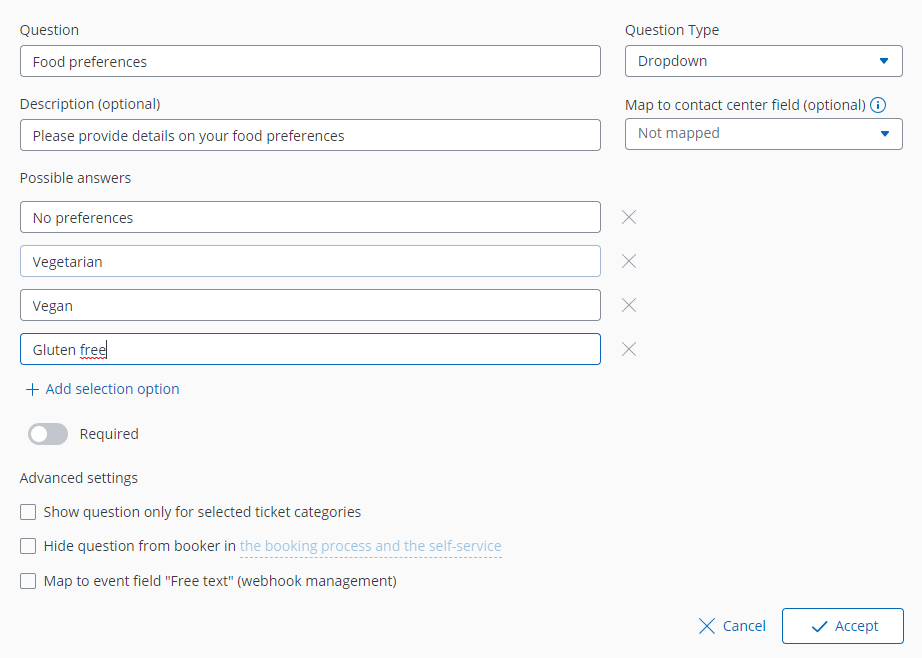
Enterprise users have the option to link the question to a data field of the contact center. This way you can collect general information about the person like position or industry not only on event level but also directly on organization level, i.e. in your doo contact center, and thus enrich your database. You can find more information about data fields here.
Via the “Required” toggle you can decide if filling out the question should be mandatory to complete a booking or if it should be optional.
By default, all custom attendee questions you create will be asked during the registration process, no matter which ticket is booked. Enterprise customers, however, have the option to ask custom questions dependent on the selected ticket category. That way they can for example define that only if the ticket category “Member” is selected by a booker he is asked to enter his member ID, while that question is hidden for non-members. Just click “Show question only for selected ticket categories” and select the respective category from the list.
In addition, you have the option to hide the question from the booker in the booking process and / or in the booking portal, e.g. to transfer existing data on the booker, such as billing information or internal IDs of a contact, unseen by him when booking.
After having provided all the settings, you can create the question by clicking “Accept”.
2.2.2. Offer products
In addition to custom questions you also have the possibility to offer free or paid products, which bookers can add to their ticket selection during the registration process such as workshops, catering or VIP packages. Products offer the possibility to define maximum capacities in order to control the number of bookings. All information about creating products and product groups can be found here.
2.2.3. Define the order of further attendee details
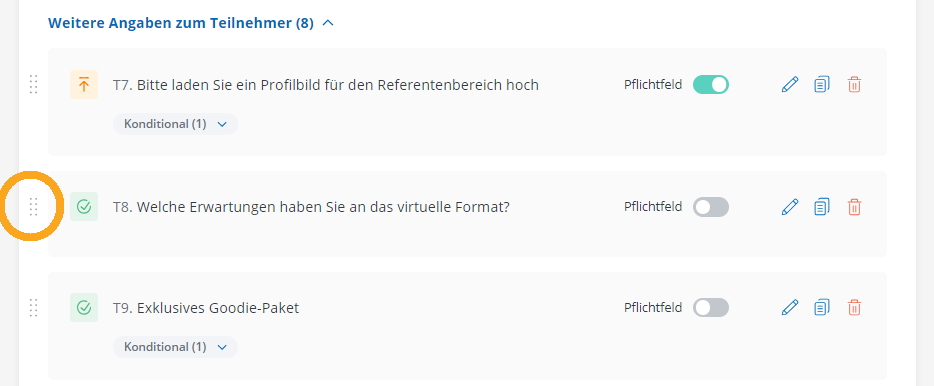
After having created your own custom questions and products, you can change their order by drag & drop. To do this, click on the dots on the left edge of the question and drag it to the desired position. The standard questions specified by doo cannot be moved.
3. Booking details
Under “Booking details” you can specify which data you would like to receive from the person making the booking.
For fee-based events the necessary information to create a proper invoice is automatically asked on booker level. This includes name, email address, address and organization, of which the latter is an optional field. For free events the name and email address are mandatory to make sure that booking confirmations can be sent, while address and organization are optional.

Analogous to the “Further attendee details”, you can also ask custom questions and create products or product groups at booker level. Please read the instructions in the previous section.
4. Advanced settings
Below the attendee and booking details you can find further settings, which offer you additional functions.
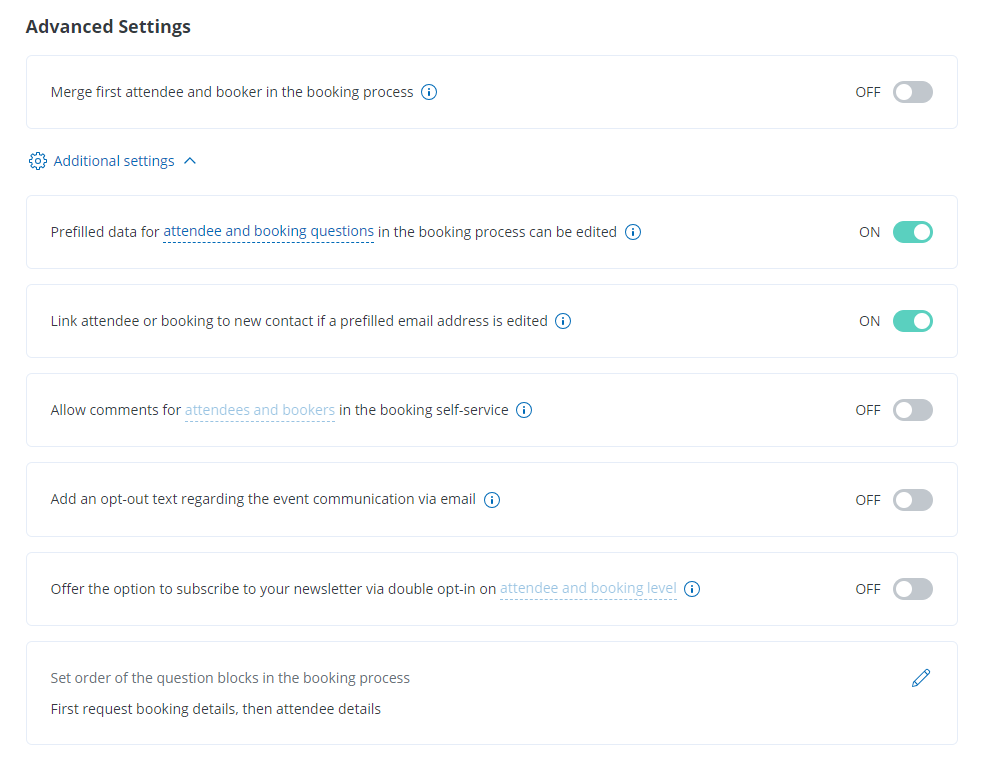
4.1. Merge first attendee and booker
You have the option to combine the questions for the first attendee and their booking data by activating the respective checkbox. This is useful, for example, if you only allow a maximum of one ticket per booking at your event or if you want to significantly shorten the booking process for your customers. As organizer, you will still receive the attendee’s data and the booker’s data separately after the booking is completed, which will then just be identical.
4.2. Prevent that prefilled questions are editable
Here you can specify whether and which data can be edited by the booker in the booking process in case contact data is prefilled. Prefilling booking or attendee data is for example possible if you are using the doo email manager for sending out invitations or personalized access codes. Not allowing the booker to edit the prefilled data is recommendable if you want to avoid that a personalized access code or a personal invitation link is used for registering a different person.
You can find all information about prefilling contact data in this article.
4.3. Contact assignment if email address is edited
At doo, bookers and attendees are assigned to existing contacts in your doo contact center based on their email address – if there’s no contact with that email address yet, a new contact will be created for the respective person.
If you are prefilling contact data in the booking process by sending an email invitation via doo or a personalizing access codes and allow the recipients to edit the prefilled data before completing the booking (see 4.2) you should decide on how to handle situations in which a prefilled email address is edited by the booker. Do you want to create a new contact for that new email address with the data that was confirmed in the course of the booking? Then please activate that option. If you want that the booking / attendee stays linked to the existing contact, which was originally invited, please deactivate that option. This setting is recommendable, if you intend to use the doo event registrations to update your contact data base. More information about data synchronization can be found here.
4.4. Comments in the booking portal
You can give your bookers and attendees the possibility to subsequently add information concerning their booking via a general comment field in the booking portal (e.g. arrival time, food preferences). These comments will then be displayed on the booking detail page in your doo event manager and in the corresponding booking and attendee exports.
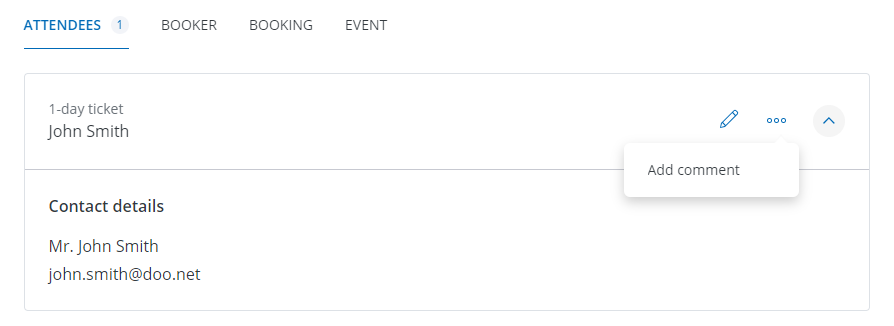
You can decide, if the comment field should be displayed on booking level (which means one comment field per booking) or on attendee level (one comment field per selected ticket). However, it usually makes more sense to allow bookers to subsequently edit their answers to your attendee and booking questions rather than using the general comment function for after-the-fact information. You can find all information about the booking portal in this article.
4.5. Opt-in and opt-out function for the email delivery
All information about collecting email permissions during the doo event registration process can be found here.
4.6. Order of the question blocks
By default, the booking process first asks for attendee details and then for the booking data. The reason for this is that attendee data is usually more relevant and meaningful for event organizers and can be used in a variety of ways (e.g., for personalizing tickets, preparing name tags, sending e-mail campaigns, evaluations) than booker data, which is primarily collected for the purpose of booking processing and, if applicable, invoicing.
However, you can specify for your event whether the attendee data or the booking data should be queried first. You can specify the order of the question blocks via “Set order of question blocks in booking process”.
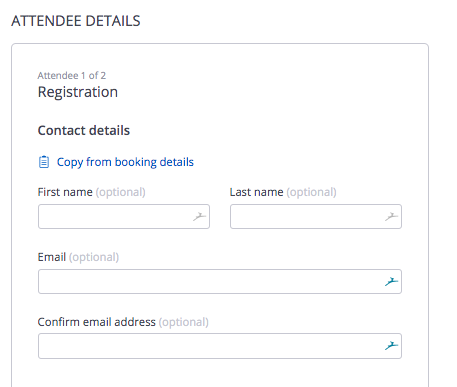
Regardless of which data you request first, your bookers can copy their answers to previous standard questions with one click, and thus, for example, automatically transfer the already entered name, address and organization from the booking details into the attendee details field to save time.
5. Accessing and managing booking and attendee details
All data that the booker enters for himself or the attendees during registration can be viewed and edited at any time on the booking details page in your doo Event Manager. All information about managing bookings can be found here.
In addition, all entries are stored in the booking overview or the attendee list of the respective event, which you can download from the event detail page. You can find more information here.
