-
General information
-
Account Settings
- Creating & managing your personal doo account
- Organization settings: Managing your account settings
- Multi-user: Working as a team
- How to reset your password
- Changing the email address of your doo account
- The doo account packages
- What can I do if a doo site does not load
- Adjusting standard labels and texts of the doo booking process
- How do I delete my account
- Payment Process: How to manage payment options
- Password Security using doo: What options are available?
-
Events
-
- Edit email contents
- Using placeholders in booking email templates
- How to adjust invoice contents
- Attendee tickets and QR code scanning
- What do doo tickets look like?
- E-mail attachments for bookers and attendee
- Certificates & Co: Create custom documents
- Define your own booking conditions
- Revenue Disbursement: Entering and editing invoice address & bank account information
- Create bilingual (multilingual) events
- Bookings with manual approval
- Create a waiting list
- Access codes and promotion codes: Discounted tickets for your participants
- doo Widgets: Integration into your own website
- doo Default Event Website and Custom Event Website
- How to create a booking process in english
- Providing flyers, event programs or direction sketches
- How does the booking process work for my attendees?
- How do I make test bookings?
- Creating exclusive registration access for selected contacts
- Delete ticket categories & change prices and sales periods after go-live
- Cancellation of events
- What are event fields and how do I use them best ?
- Shorten the booking process and prefill data: How to make the booking process as convenient as possible for bookers
- Tips for virtual events with doo
- Integration into your own Facebook page
- Event Templates: Creating templates for your events
-
Manage Bookings
- Manage bookings and attendees
- Monitoring incoming bookings
- The attendee overview
- Invitation list: Track the registration status of specific contacts
- Manual registration
- Resend automatically generated emails
- Rebooking: How to change existing bookings
- Cancellation & Refund Handling
- Booking self-service: Allow bookers to subsequently access and edit their bookings
- Download booking overview and attendee list
- Change of attendee data and invoice address
- Bank transfer: How to deal with pending transactions
- What to do, if someone has not received their confirmation e-mail or ticket
-
Contact Management
- Contacts: Introduction and Topic Overview
- Contact details: Collect cross-event contact information
- Overview contact data fields
- Managing contact data fields
- Creating contacts - How do contacts get into the doo contact center?
- Contact import - Bulk creation and editing of contacts
- Managing existing contacts
- Creating and managing contact groups
- Datamatching & Synchronization of booking data and doo contact
- Email subscriptions: Double opt-in & opt-out options at doo
- Deleting contacts
-
Emails
-
Websites
- The doo website editor: create an individual event page
- Mobile optimization: Customize your site for all your devices
- Installing different tracking tools on the website
- Creating a SSL certificat (HTTPS) to ensure data security
- Website Tracking: How to integrate doo into your Google Analytics To be Created
-
Additional Functions
- Optional Service: Refund handling via doo
- Ticket design: How to get your ticket in the desired design
- Forms - Set up surveys and feedback requests for your attendees
- Embedded Reports
- Customer specific sender emails
- Email inbox: How to manage email requests from your participants within doo
- Add calendar entries to your event communication
- Filtered cross-event widgets: How to show only selected events
- Widgets and Accessibility
-
Automations
-
Booker & Attendee FAQ
-
On-Site and Attendance
How does the booking process work for my attendees?
The doo booking process for fee-based events consists of three steps (ticket selection, registration data and payment method selection) – for free bookings the third step is omitted. Subsequently an email confirmation is sent out.
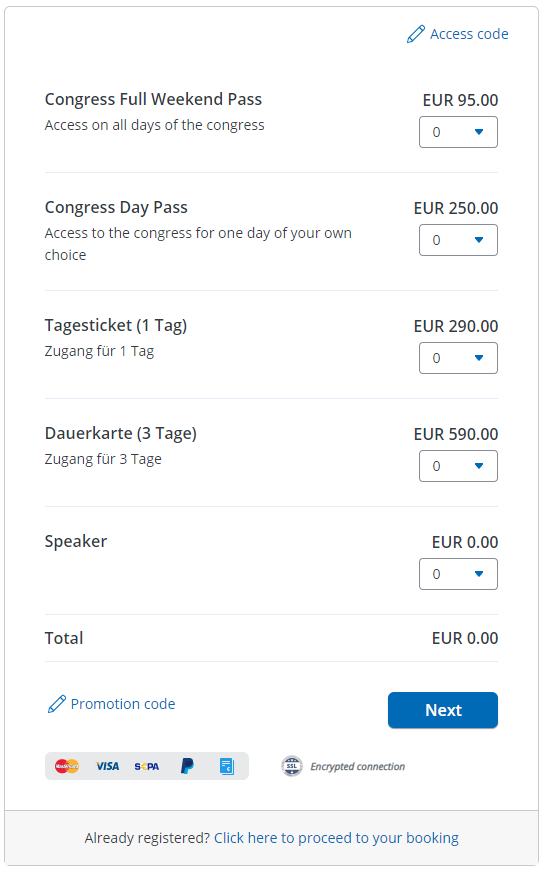
1. Ticket selection
On the event website, your bookers can select the desired type and number of tickets. The total invoice amount is automatically calculated and displayed below.

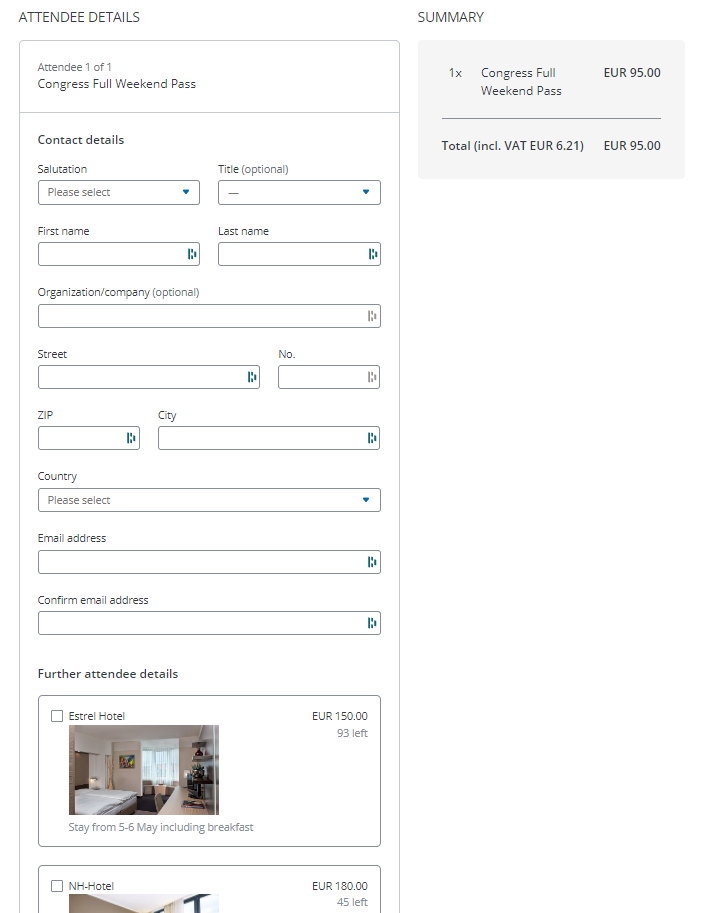
2. Attendee data
After the booker has confirmed his ticket selection by clicking on “Next”, he is asked to enter the personal attendee and booker data you defined in step 3 of the event creation.

The attendee or booker data, such as name, e-mail address or address, that is entered first can be transferred by the booker with one click to the corresponding fields of subsequent attendee or booking data, so that he does not need to enter them more than once.
Only after all mandatory fields are filled out the booker can proceed. If it’s a free booking, he just needs to confirm the booking terms (see 3.) to complete the booking and he is directed to the confirmation page (see 5.). If it’s a fee-based booking he is directed to the next step where he can select his payment method (see 4.).
3. Accept booking terms
Accepting the booking terms by checking the respective box at the bottom of the page is mandatory to complete a booking. Please make sure to define your booking and cancellation conditions in advance to make them available and transparent to your bookers. Here you can read more about how to define your own booking conditions.
4. Payment
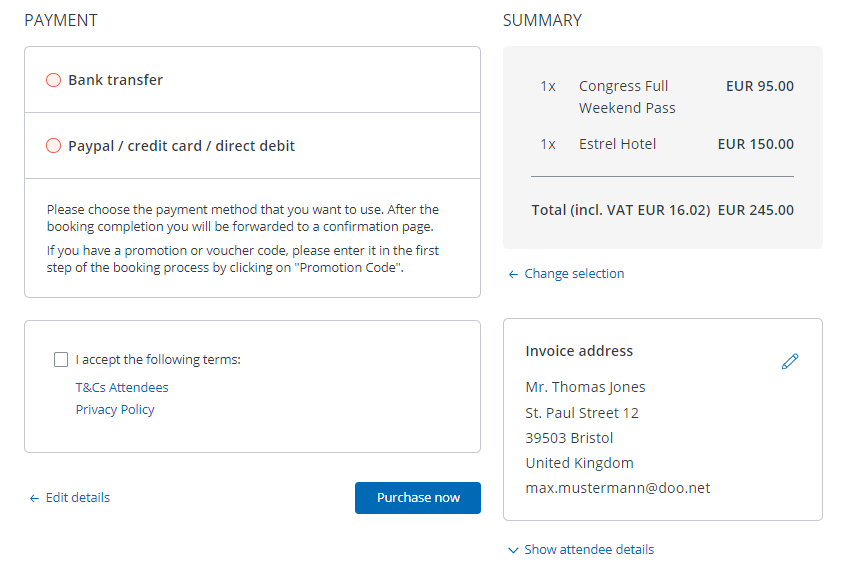
Depending on which payment options are stored for your event, the booker can now choose between the available payment methods. For example, if payment is processed via doo, your booker can choose between the payment methods bank transfer and Paypal / credit card / direct debit. You can find all information about payment options here.
4.1. Payment via bank transfer (payment processing via doo)
After a person has completed the booking by clicking on “Purchase now”, he will be directed to the confirmation page (see 5.). At the same time he will receive an email with a PDF invoice as payment request, which contains all information for the transfer to our bank account (email text: Request for payment with invoice).
Please note that seven days before the event starts “bank transfer” is automatically deactivated as payment method, so that it is still realistic that the booker’s transfer is credited to our bank account in time and the tickets can be send out before the event starts. From then on, only the instant payment methods are available. If you would like to extend the period of bank transfer payments, accepting that some invoices may not be paid until after the event, please contact our Support Team mentioning the event ID in your message.
If a booker does not pay immediately, you can set regular payment reminders in the payment settings. The frequency of the payment reminders can also be set there. The contact person of your doo account will be notified two days before the start of the event if there are still any unpaid bookings, so that you can decide on how to proceed with them. All information on how to handle bookings with pending payments can be found here.
As soon as the invoice amount has been credited to our bank account, the booker will receive an email confirming the receipt of payment – depending on the event settings – eventually with the respective ticket(s) attached (email text: booking confirmation).
4.2. Payment via Paypal / credit card / direct debit (payment processing via doo)
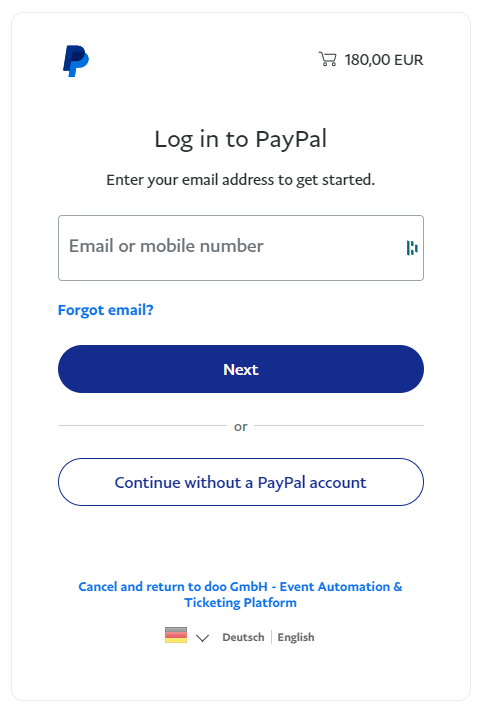
If paying via “PayPal / credit card /direct debit”, the booker will be redirected to a PayPal page after clicking on “Book now”. He can then either log into his PayPal account and complete the payment. Alternatively, he can click “Continue without a PayPal account” and continue by entering his email address and make the payment via credit card or direct debit without having to create a PayPal account.

After the successful payment the booker is redirected to the confirmation page (see 5.).
5. Confirmation page
After a booking is successfully completed a confirmation page is displayed, by default with the link to the booker self-service center where the booker can review all information regarding his booking, the event and the booking conditions and download eventual documents such as tickets or invoices.
For more information about that booking portal please follow this link.
6. Email confirmation
Directly after a successful registration or payment, the booker will receive a confirmation email (email text: booking confirmation), eventually with payment receipt and ticket(s), sent to the email address he entered as booking contact person. If you would like to adjust the content of this email, please click here.
7. Reminder email before the event
By default, four days before the event, all bookers with active bookings will receive an automatic event reminder via email (email text: event reminder). If you activated tickets for your event, they will be attached to that reminder email. If you would like to deactivate the automatic reminder emails for your account please contact our Support Team.
Important: If you are working with manual approval of bookings, the booking process differs from the description above. You can find all information about the manual approval feature in this article.

