-
General information
-
Account Settings
- Creating & managing your personal doo account
- Organization settings: Managing your account settings
- User Management: How to Work as a Team
- How to reset your password
- Changing the email address of your doo account
- The doo account packages
- What can I do if a doo site does not load
- Adjusting standard labels and texts of the doo booking process
- How do I delete my account
- Payment Process: How to manage payment options
- Password Security using doo: What options are available?
-
Events
-
- Edit email contents
- Using placeholders in booking email templates
- How to adjust invoice contents
- Attendee tickets and QR code scanning
- How do doo tickets look like?
- E-mail attachments for bookers and attendee
- Certificates & Co: Create custom documents
- Define your own booking conditions
- Revenue Disbursement: Entering and editing invoice address & bank account information
- Create bilingual (multilingual) events
- Bookings with manual approval
- Create a waiting list
- Access codes and promotion codes: Discounted tickets for your participants
- General Event Documents: Share Presentations and Materials with Attendees
- Event Staff: Restricted user access for specific events
- doo Widgets: Integration into your own website
- doo Default Event Website and Custom Event Website
- How to create a booking process in english
- Overview: Providing event documents such as flyers, presentations or certificates
- How does the booking process work for my attendees?
- How do I make test bookings?
- Creating exclusive registration access for selected contacts
- Delete ticket categories & change prices and sales periods after go-live
- Cancellation of events
- What are event fields and how do I use them best ?
- Shorten the booking process and prefill data: How to make the booking process as convenient as possible for bookers
- Tips for virtual events with doo
- Integration into your own Facebook page
- Event Templates: Creating templates for your events
-
Manage Bookings
- Manage bookings and attendees
- Monitoring incoming bookings
- The attendee overview
- Invitation list: Track the registration status of specific contacts
- Manual registration
- Resend automatically generated emails
- Rebooking: How to change existing bookings
- Cancellation & Refund Handling
- Booking self-service: Allow bookers to subsequently access and edit their bookings
- Download booking overview and attendee list
- Change of attendee data and invoice address
- Bank transfer: How to deal with pending transactions
- What to do, if someone has not received their confirmation e-mail or ticket
-
Contact Management
- Contacts: Introduction and Topic Overview
- Contact details: Collect cross-event contact information
- Overview contact data fields
- Managing contact data fields
- Creating contacts - How do contacts get into the doo contact center?
- Contact import - Bulk creation and editing of contacts
- Managing existing contacts
- Creating and managing contact groups
- Datamatching & Synchronization of booking data and doo contact
- Email subscriptions: Double opt-in & opt-out options at doo
- Deleting contacts
-
Emails
-
Websites
- The doo website editor: create an individual event page
- Mobile optimization: Customize your site for all your devices
- Installing different tracking tools on the website
- Creating a SSL certificat (HTTPS) to ensure data security
- Website Tracking: How to integrate doo into your Google Analytics
- E-Commerce dataLayer-Events in our Widgets
-
Additional Functions
- Optional Service: Refund handling via doo
- Ticket design: How to get your ticket in the desired design
- Forms - Set up surveys and feedback requests for your attendees
- Embedded Reports
- Customer specific sender emails
- Add calendar entries to your event communication
- Filtered cross-event widgets: How to show only selected events
- Widgets and Accessibility
-
Automations
-
Booker & Attendee FAQ
-
On-Site and Attendance
doo On-Site Management
Important preliminary note: The doo access management is a new add‑on module that is currently still in the beta phase. In the coming weeks and months, additional features will be added, such as verifying and editing attendee data and badge printing via the browser kiosk mode on Windows. If you are interested in the new module, please feel free to contact your doo representative or our Support Team.
With the new doo access management, you can scan your attendees on site using a laptop/tablet and hand scanner without leaving the familiar doo environment. This allows you to verify ticket validity, redeem tickets, and document your attendees’ presence. After the initial setup by doo, the doo access management is available to you at any time in self‑service.
1. Is the doo On-site management suitable for my events?
The doo access management has been specifically designed for organizers who regularly run small to medium‑sized events with a simple setup and a maximum of 500 attendees, and who want to handle check‑in independently using a standardized solution.
With doo access management, you can quickly scan your attendees on site using the QR code on their tickets or wallet passes, and in the future, you will also be able to print simple black‑and‑white badges or labels. Currently, there is no planned support for more complex events that require additional check‑ins for sessions or products. In addition, the access solution works only online via the doo Manager App – there is no offline mode.
To make full use of the tool’s capabilities and remain as independent as possible during use, we recommend that you purchase the necessary hardware yourself. This includes a laptop/tablet, barcode scanner, and, if needed, a printer. Together with our partner Choose2Rent, we also offer an option to rent a standard hardware package.
Please note that doo cannot guarantee that a specific combination of devices will work, nor can we provide support for setup, maintenance, or compatibility between scanners, printers, and laptops/tablets. We are happy to share our experience with you and advise you to the best of our knowledge, but given the wide range of devices and possible combinations, it is impossible for our team to foresee or resolve every potential issue.
If you plan to work with doo access management, it is important—especially the first time or after a longer break—that you test your setup early. It is also helpful to have someone with basic technical understanding on your team who can train your staff and provide support when questions arise.
2. How does the doo On-site management work?
2.1. Access On-site management
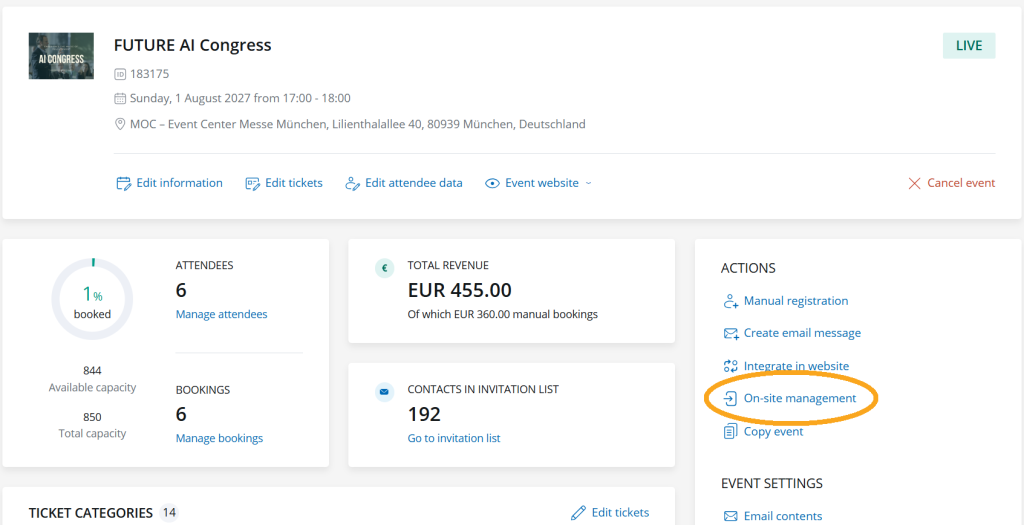
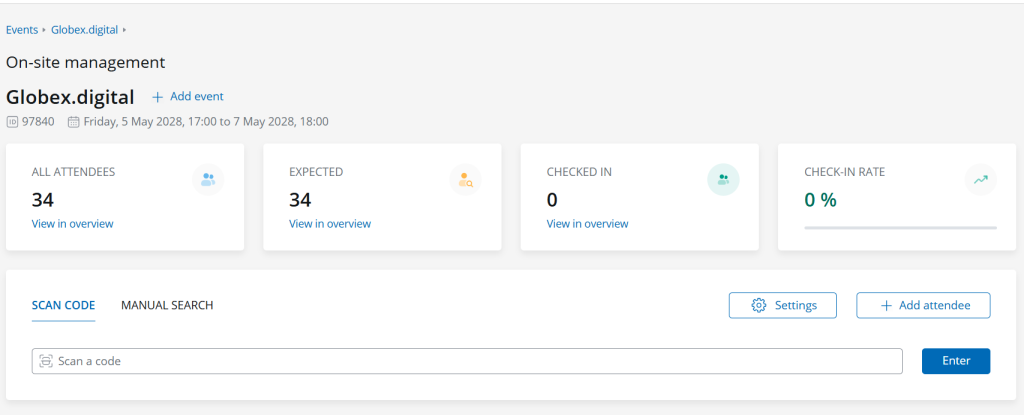
Select “On-site management” in the event overview or in the event details.
On this page, you will first find the summary:
- Key details of the selected event
- Metrics by attendee status (an explanation of all attendee statuses can be found in the article on the attendee overview)
- All attendees: Total number of attendees with the status “Expected” or “Checked in.”
- Expected: Number of attendees who hold a valid ticket for the event.
- Checked in: Number of attendees whose tickets have already been scanned/redeemed.
- Check-in rate: Ratio of checked‑in attendees to all attendees.
Via the “Go to overview” link, you can open the filtered attendee list directly in the attendee overview.
In the lower section, you will find the scan and search area. Here you can search for attendees and check them in quickly.
Through the settings, you can control the app’s behavior during scanning.
Attendees who are not registered can be added manually via “Add attendee.”
2.2. Configure your scanner
Please refer to your device’s user manual for detailed instructions on how to configure your scanner. Unfortunately, we cannot provide device‑specific support. Below, we have compiled a few tips that may help you set up your scanner:
If desired, configure the scanner to automatically send the Enter command after each scan, so you do not need to click manually after the value is entered. In more technical documentation, this may be referred to as “Carriage Return and Line Feed (CRLF)”.
The CRLF needs to be appended to the scanned value (often called a “termination suffix.”)If values are not scanned correctly:
- Ensure that the scanner’s language matches the input/keyboard language on your laptop or tablet.
- Check that the scanner’s encoding is set correctly.
- Some scanners allow you to choose between continuous/automatic scanning and scan on button press. Select the option that best fits your on‑site workflow.
2.3. Check in attendees
2.3.1. Tickets mit QR-Code scannen
In the “Scan code” tab, you will see the input field for doo QR codes or the doo ticket ID. In principle, this field functions like a standard search field. You can enter a doo ticket ID to search for the corresponding attendee and check them in. However, doing this manually on site would be slow and impractical. This is why we recommend performing check‑in using a barcode scanner—this is where the true strength of on‑site management unfolds.
The barcode scanner takes over the data entry. Click the scan icon at the beginning of the input field or press “/” on your keyboard to place the focus on the field. When you then scan a QR code, the scanner inserts the value into the field. Most scanners also allow you to configure the input so that the scanner sends the Enter command automatically. This means you don’t need to press the button each time—the scanner does it for you. If the scanned value corresponds to a valid ticket, the system will—depending on your settings—do one of the following:
- open the attendee details in a side panel,
- automatically check in the attendee,
- send a print job for the attendee’s badge to the browser.
2.3.2. Find attendees manually
With the manual search, you can find attendees by name, organization, or email address. This is useful, for example, when someone has forgotten their ticket.
As soon as you select an attendee from the dropdown with the search results, the attendee details open. Here, you can check the person in, view and edit all attendee data, and—if you have configured a badge—see a preview of the badge and start the printing process.
Tip: When you are in the “Manual search” tab, you can press “/” to place the cursor in the search field via keyboard, allowing you to navigate the search without using a mouse.
2.3.3. Errors during searching or scanning
When you scan or search for an attendee’s ticket, you will receive a success message if the attendee is found and has a valid ticket that is redeemed through the input. If something goes wrong, an error occurs. Below we explain the possible errors:
The attendee has already been checked in; the ticket is already redeemed.
- The attendee does not have a valid ticket. Only attendees with the status “Expected” can be checked in (more information can be found in this article). Other attendee statuses indicate that:
- the booking has not been approved,
- the booking was rejected,
- the attendee is still on the waiting list,
- the attendee was removed from the waiting list,
- the booking has not yet been paid,
- the booking or the ticket has been canceled
- The system could not identify a unique value, so no automatic actions are possible. Please check your input.
The system could not find a match. Adjust your input.
- The scan field searches for the ticket ID.
You can also search using the check‑in URL, which is embedded in the QR codes by default.
You can also find the ticket ID in the export of the attendee list. The field in manual search looks for attendees by name, email address, and organization.
The search follows the same rules as the quick search in the attendee overview.
- The scan field searches for the ticket ID.
2.4. Manage and add new attendees
To view all data, make changes, or access additional booking information, please use the attendee overview or the booking overview.
By clicking the “Add attendee” button, you open the manual booking process in a new tab, where you can register additional attendees.
3. What equipment do I need for on‑site check‑in?
3.1. Laptop or Tablet
To open the doo Event Manager, you need an internet‑enabled device. We recommend using a laptop or a tablet with a keyboard, especially if you plan to edit data or register additional attendees on site.
If you only want to scan tickets, a tablet may also work (we have tested with a Surface and a Samsung Galaxy). However, you must test the tablet together with your handheld scanner yourself, as we unfortunately cannot make general compatibility statements. In our tests, we were able to connect the handheld scanner to the tablet via an adapter with a USB‑C port and a USB‑A input. When choosing an adapter, ensure that it includes a charging port in addition to the USB‑C connection if you plan to connect the tablet to a power source on site.
If you want to print badges/labels on site, you will need a device running Windows as the operating system and the latest version of Edge, Chrome, or Firefox as your browser. Automated printing is configured via the browser’s kiosk mode, which is only supported on Windows.
Don’t forget to ensure that all devices have fully charged batteries and that charging options are available if needed.
3.2. Handscanner
To scan QR codes and avoid unnecessary manual typing, we recommend using a handheld scanner, specifically a 2D barcode scanner. We have tested the setup with the Tera D5100‑WB Wireless 2D Barcode Scanner.
What to consider when selecting a device
The scanner must be able to read QR codes on both paper and mobile devices (on‑screen).
→ Look for a 2D scanner with decoding capability for QR codes.Ensure sufficient battery life and charging options, depending on your on‑site usage scenario.
The scanner must offer a configuration option to automatically append an Enter command to the scan result
→ Often described as Carriage Return and Line Feed (CRLF) as termination suffixes.The scanner must be compatible with the operating system of your laptop or tablet.
The scanner must support the system language/keyboard language of your laptop or tablet.
Regarding connectivity, scanners may support Bluetooth, wired, or wireless with receiver.
Since Bluetooth can sometimes be unreliable, we recommend choosing a device that supports at least one additional connection option.
Consider adapters or available USB ports to ensure that all connected devices and charging cables can be accommodated.
3.3. Internet connection
The doo on‑site management requires a stable internet connection for scanning and printing. Please take this into account when planning your event. For larger events, keep in mind that a mobile internet connection in particular may become overloaded due to the mobile devices of your attendees. The safest option is a separate network that you can connect to via Wi‑Fi, or even better, via LAN, if available.